Biblical Heritage #StudyBible User Manual
Introduction
This manual explains the main screens and controls in Biblical Heritage #StudyBible. It is designed to help new users begin reading, studying, navigating, and using the main tools of the app.
Additional sections can be expanded over time as screenshots, examples, and workflow notes are added.
Manual Overview
This manual is organized so readers can either work through the app step by step or jump directly to the section they need.
Main Feature Areas
Biblical Heritage #StudyBible includes these main areas:
- Entry Screen
- Bible Explorer
- Utilities
- Themes and reading appearance
- Highlights and tags
- Interlinear and study tools
- Notes, commentary, and study workflows
- Support and About information
Quick Navigation Guide
Readers who want to jump directly to a subject can use the section list below.
- Entry Screen: Opening screen, main buttons, and first actions
- Bible Explorer: Main reading and navigation area
- Utilities: Setup tools, support tools, and additional functions
- Themes: Reading themes and display choices
- Study Tools: Highlights, how to use
#tags, how to use$tags, Bible Memory tools, interlinear tools, and related study workflows - Notes and Commentary: Study notes, commentary access, and sharing-related workflows
- About and Support: App information, version details, and support access
How To Use This Manual
New users may want to begin with the Entry Screen section and continue in order.
Experienced users can use the overview and section headings to move directly to the feature they want to learn.
Most Powerful Features
The strongest everyday features in Biblical Heritage #StudyBible are these:
Bible Explorer: the main reading and study environment# tags: reusable verse lists for sharing, topical study, and memory work$ tags: ordered study chains for teaching, sermons, and presentation useVerse Search: fast Scripture search with filters and logicCommentary Library: imported commentary and research material for deeper studyCloud Backup: backup and restore for preserving study work
If you want the shortest path into the app's most useful workflows, start with Bible Explorer, then learn # tags and $ tags.
Entry Screen
The Entry Screen is the opening page of Biblical Heritage #StudyBible. It provides access to the main study area, app utilities, theme selection, and general app information.
Main Controls
Choose Theme
The aA control in the upper-right corner opens the theme selector for the current session.
From the Entry Screen, the user can quickly choose from the main reading themes. Additional themes can also be accessed later from the Bible Explorer screen.
Purpose:
- Adjusts the visual reading theme.
- Helps make the display more comfortable for different lighting conditions and reading preferences.
App Logo and Title
The Biblical Heritage logo and the Biblical Heritage #StudyBible title identify the app and confirm that the user is on the opening screen.
This part of the screen is informational and does not open another page.
Scripture Quotation
The Entry Screen displays a welcome verse:
"But sanctify the Lord God in your hearts: and be ready always to give an answer to every man that asketh you a reason of the hope that is in you with meekness and fear:"
1 Peter 3:15 (KJV)
This verse is presented as an opening reminder of the spirit and purpose of the app. It is informational and is not a button.
Description Panel
The description panel provides a brief summary of the app:
A shareable KJV study Bible for personal and group study with highlights, tags, and interlinear tools.
This panel introduces the main purpose of the application and is informational only.
Bible Explorer
The Bible Explorer button opens the main reading and study area of the app.
This is the primary action on the Entry Screen and is the normal starting point for reading and study.
Purpose:
- Opens the main Bible reading screen.
- Gives access to the study environment and navigation tools.
- Serves as the usual starting point for daily use.
Utilities
The Utilities button opens the utilities section of the app.
This area is used for support tools, setup features, and additional app functions that are separate from the main reading screen.
Purpose:
- Opens tools and support features.
- Provides access to setup-related functions.
- Separates utility functions from the main reading area.
About
The About button opens the About dialog.
The About dialog includes general app information such as:
- App name
- Version information
- Copyright information
- Support access
From the About dialog, the user can also open support information when needed.
Entry Screen Summary
When the app opens, the Entry Screen appears. Use Bible Explorer to begin reading and study. Use Utilities for setup tools and support functions. Use Choose Theme in the upper-right corner to select a reading theme for the current session. Additional themes can also be accessed later from the Bible Explorer screen. Use About for version and support information.
Utilities
The Utilities screen contains setup, sharing, backup, support, and study-library tools for Biblical Heritage #StudyBible.
This screen is reached from the Utilities button on the Entry Screen.
Main Controls
Back Arrow
The back arrow in the upper-left corner returns to the starting screen.
Use this control when you want to leave Utilities and go back without opening another tool.
Utilities Title and Description
The title and subtitle identify this page as the utility area of the app.
The subtitle explains the purpose of the screen:
Setup and sharing tools for Biblical Heritage #StudyBible.
This part of the screen is informational only.
Phone Silencer (Geofence) / Church AutoMute
This control opens the church silencing feature area.
Depending on the app version, this feature may appear as Phone Silencer (Geofence) or Church AutoMute.
In the current corrected version, Church AutoMute displays a notice explaining that the feature is under construction for a future version. The notice explains that setup is being simplified so it will be easier to use for silencing a phone during church and restoring normal mode afterward.
Purpose:
- Identifies the planned church silencing feature.
- Explains that the feature is not yet fully available in the current version.
- Helps users understand that this area is reserved for a future update.
Cloud Backup
The Cloud Backup button opens the backup and restore tools.
Purpose:
- Helps protect study material and user data.
- Provides access to cloud-based saving and restoration features.
- Supports moving or recovering study information when needed.
When opened, the Cloud Backup dialog explains that users can back up or restore study data. It also explains that Export to Files is the preferred choice for a real backup that can be reached later in Files or iCloud Drive, while app storage is intended only for local in-app snapshots.
Main actions:
Restore: restores previously saved app data when available.Save in App: stores a local in-app snapshot.Export to Files: exports a backup to a user-reachable location such as Files or iCloud Drive.Close: closes the backup dialog and returns to the Utilities screen.
Commentary Library Setup
The Commentary Library Setup button opens the commentary library screen.
Purpose:
- Helps the user set up commentary resources.
- Provides access to commentary-library preparation and management.
- Supports later use of commentary tools throughout the app.
Commentary Instructions
The Commentary Instructions button opens help information for commentary features.
Purpose:
- Explains how commentary tools work.
- Helps users understand setup and use before beginning.
- Serves as a quick help reference for commentary workflows.
This instruction area explains that Biblical Heritage uses an EPUB-first commentary approach, recommends downloading files to a normal browsable folder, explains the use of Commentary Library Setup, and describes how Choose Sync Base, Import EPUB/PDF, and Sync Now work together.
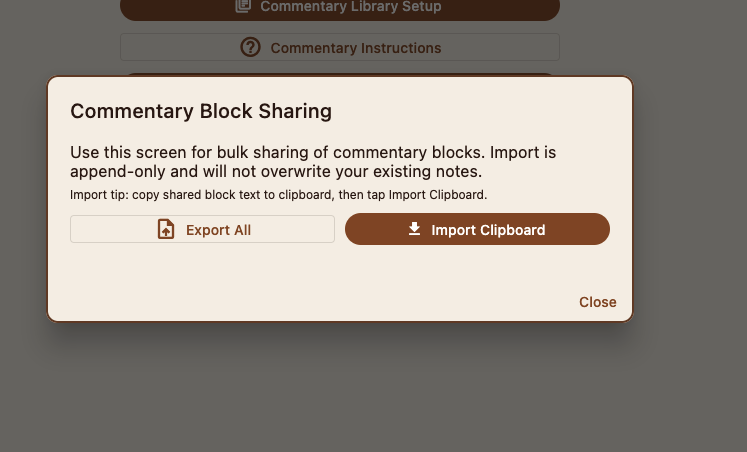
Commentary Block Sharing
The Commentary Block Sharing button opens tools for sharing commentary blocks.
Purpose:
- Supports sharing commentary material in a structured format.
- Helps users move commentary blocks between people or devices where supported.
- Assists collaborative study and shared resource use.
The Commentary Block Sharing dialog is intended for bulk sharing of commentary blocks.
Main actions:
Export All: exports commentary block content for sharing or transfer.Import Clipboard: imports commentary block text that has already been copied to the clipboard.Close: closes the dialog and returns to the Utilities screen.
Important behavior:
- Import is append-only.
- Imported commentary blocks do not overwrite existing notes.
- A user can copy shared block text to the clipboard first, then select
Import Clipboard.
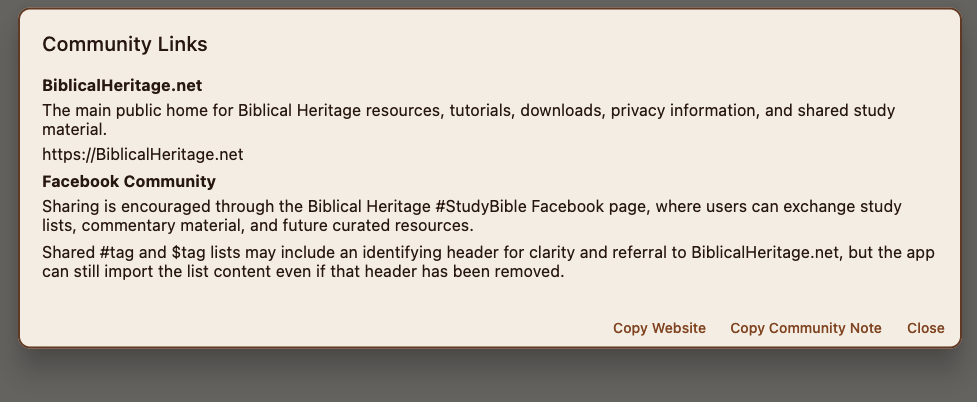
Community Links
The Community Links button opens web or community-related links connected with Biblical Heritage.
Purpose:
- Provides quick access to related online resources.
- Helps users find community pages, connected sites, or shared information sources.
The Community Links dialog provides quick reference information for the main Biblical Heritage website and the sharing community.
It includes:
BiblicalHeritage.net, described as the main public home for resources, tutorials, downloads, privacy information, and shared study material.Facebook Community, described as a place where users may exchange study lists, commentary material, and future curated resources.- a note explaining that shared
#tagandtaglists may include an identifying header for clarity and referral to BiblicalHeritage.net, while the app can still import the list content even if that header has been removed.
Main actions:
Copy Website: copies the website information or website link.Copy Community Note: copies the community-sharing note text.Close: closes the dialog and returns to the Utilities screen.
Support Biblical Heritage
The Support Biblical Heritage button opens the support or donation area.
Purpose:
- Provides access to ways of supporting the project.
- Helps users reach donation or support information from within the app.
Open Bible Explorer
The Open Bible Explorer button opens the main Bible reading and study screen.
Purpose:
- Returns the user to the main reading environment.
- Provides a direct path from Utilities back into study mode.
Utilities Summary
The Utilities screen gathers together setup tools, backup tools, commentary-library setup, commentary help, commentary sharing, community links, and support options. It also includes a direct button for opening Bible Explorer when the user is ready to return to reading and study. Some tools, such as Church AutoMute, may currently serve as placeholder or future-version areas, while others already support active workflows such as commentary import, backup, and sharing.
Importing Commentary Files
Biblical Heritage #StudyBible supports importing commentary and research files for personal study use.
When the same material is available in both formats, EPUB is recommended over PDF. EPUB is generally better for reading flow, paragraph handling, navigation, and future commentary features inside the app.
Important Caution
Users are responsible for making sure they have the legal right or permission to download, store, import, and use any files added to the app.
Biblical Heritage #StudyBible does not include third-party commentary files and does not grant permission to use copyrighted works. The app only provides tools for importing files the user has lawfully obtained.
Example Using the EGW Writings Website
One clear example is the EGW Writings website. A user may visit the EGW Writings website, locate EPUB files that are available there for lawful personal use, download those EPUB files to the device, and then import them into Biblical Heritage #StudyBible.
This example is only meant to show the import process. Users should still make sure they understand and respect the terms, permissions, and rights connected with any file they choose to download and use.
The same import method can also be used for other EPUB or PDF files of the user's own choosing.
Commentary And Research
The app separates imported files into two different library types: Commentary and Research.
Commentary is intended for BC commentary volumes that are recognized by the app and connected to Bible-book ranges. These files are used as structured commentary sources for the commentary-reading workflow.
Research is intended for other imported EPUB or PDF books that do not function as the built-in BC commentary set. These may still be useful for study, reference, comparison, and personal research, but they are handled separately from the commentary library.
This difference matters when choosing files to import:
- Files recognized as BC commentary volumes are routed into
Commentary Library. - Other EPUB or PDF books are routed into
Research Library. - A user is not limited to commentary volumes only. General study books, reference books, and other EPUB or PDF materials may still be imported, but they may appear in the research section rather than the commentary section.
- If a user expects a file to behave like a BC commentary volume, the file should match the recognized commentary pattern used by the app.
Recommended Workflow
- Download the commentary or study files to a normal folder such as
Downloads,Desktop, or another folder that is easy to browse. - If possible, choose EPUB files rather than PDF files.
- Open
Utilities. - Select
Commentary Library Setup. - If you want the library mirrored to a cloud-backed location, select
Choose Sync Base. - Choose a base folder of your own choice. You may name this base folder anything you like, such as
StudyBible LibraryorCommentary Sync. - The app automatically creates the managed subfolders
commentary_libraryandresearch_libraryinside that chosen base folder. - Select
Import EPUB/PDF. - Browse to the files you downloaded and select them.
- BC commentary volumes are routed automatically into
Commentary Library. - Other EPUB or PDF books are routed automatically into
Research Library. - The app copies imported files into its managed library, and the original source files remain unchanged.
- If sync is configured, select
Sync Nowto mirror the managed library to the chosen sync base.
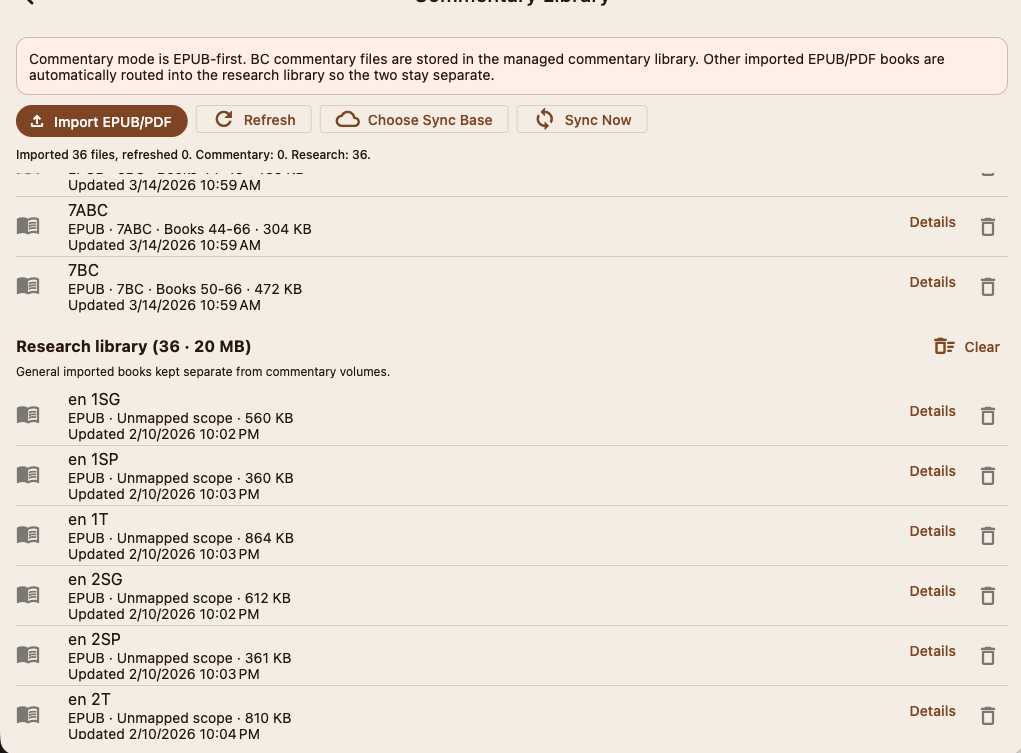
Managing Files From The Library Screen
The Commentary Library screen also allows the user to manage imported files after they have been added.
- Individual files can be removed directly from the library screen.
- Clearing or deleting a file removes the managed app copy from the commentary or research library.
- Removing a file does not change the user's original source file that was downloaded or stored elsewhere.
Choose Sync Base
Choose Sync Base lets the user select a base folder for cloud-backed or shared library syncing.
This is the top-level folder the user chooses for mirrored library storage. The app then creates and maintains the subfolders commentary_library and research_library inside that location.
This is useful when the user wants the managed library copied into a location backed by OneDrive, iCloud Drive, or another synced folder system.
Sync Now
Sync Now updates the managed library in the selected sync base.
This can:
- mirror imported commentary files into the sync base
- mirror imported research files into the sync base
- pull down matching files from the sync base when used on another device with the same synced folder
Sync Now works with the app's managed library copies. It does not change the user's original downloaded source files.
Notes
- The user may choose the name of the base sync folder.
- The app itself creates and uses the managed subfolder names
commentary_libraryandresearch_library. - Commentary mode and research mode are kept separate inside the managed library structure.
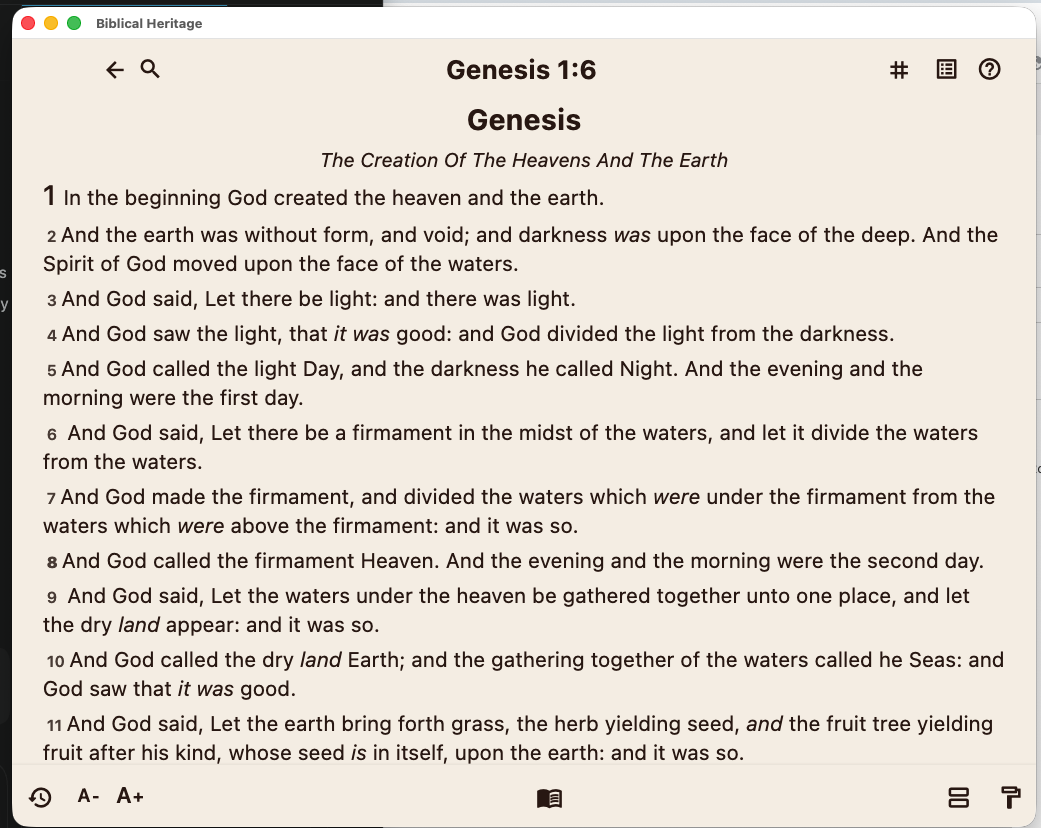
Bible Explorer
Bible Explorer is the main reading and study screen of Biblical Heritage #StudyBible.
This is the central place where the user reads Scripture, moves between passages, opens study tools, adjusts reading size, and works with verse-based study features.
At the top of the screen, the current reference is shown in the center. In the example shown, the screen is displaying Genesis 1:6, with the book title and chapter heading visible above the passage text.
The main body of the screen shows the Bible text itself. Verse numbers appear at the left of each verse, and the reading area is designed for direct study, selection, and navigation.
The top bar contains quick access to navigation, search, tags, topics, and help. The bottom bar contains quick access to history, font-size adjustment, commentary, mode controls, and settings-related tools.
Most Important Sharing Feature
One of the most important controls on the Bible Explorer screen is the # tag feature.
In the current interface, this appears as the tag button in the top bar. This feature is especially important because it supports Bible sharing and group study workflows.
# tags are used to collect and organize verse lists. They are especially useful for:
- building personal or group study lists
- saving sets of verses for later review
- sharing verse collections with others
- preparing material that can later be imported into other parts of the app
The app's own help text describes # tags as the starting point for group work. They let the user gather Scriptures first, share the list with others, and later turn that list into memory drills, study groups, or a $tag presentation chain when needed.
This makes the # tag feature one of the most important sharing tools in Bible Explorer.
Bible Explorer Summary
Bible Explorer is the main Scripture-reading screen. It combines the Bible text itself with navigation and study controls in the top and bottom bars. For many users, the most important sharing feature on this screen is the # tag tool, because it allows verse lists to be collected, organized, shared, and reused in other study workflows.
Top Bar: Back And Search
The left side of the top bar begins with two important controls: Back and Search.
Back
The back arrow returns the user to the previous screen.
In normal use, this is the quickest way to leave Bible Explorer and return to the prior area of the app.
Search
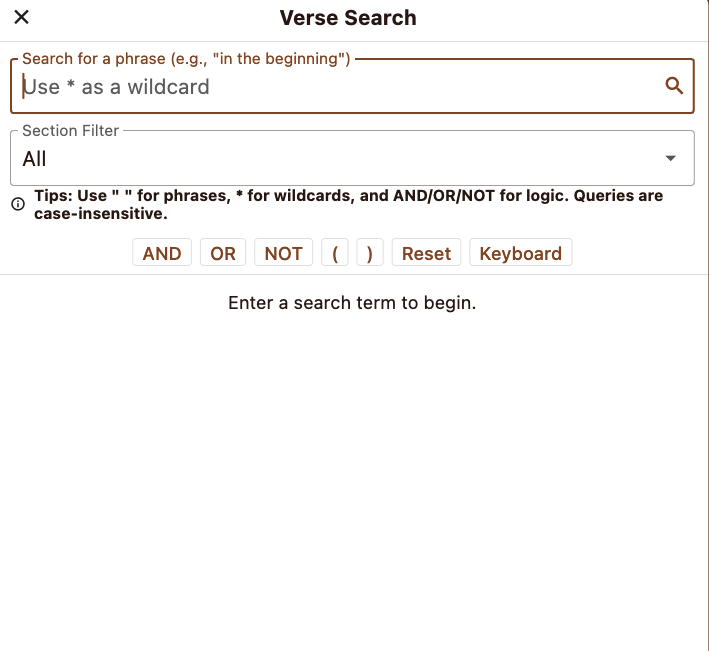
The search button opens the Verse Search screen.
Verse Search allows the user to search for words, phrases, and patterns in Scripture. It also includes tools for narrowing the search to a selected section of the Bible.
Verse Search Screen
The Verse Search screen includes:
- a main search field
- a
Section Filter - search tips shown on the screen
- helper buttons such as
AND,OR,NOT, parentheses,Reset, andKeyboard
How To Narrow A Search
Users can narrow a search in several ways.
1. Search for an exact phrase
Use quotation marks when searching for a phrase.
Example:
"in the beginning"
This helps the app look for the exact phrase instead of separate individual words.
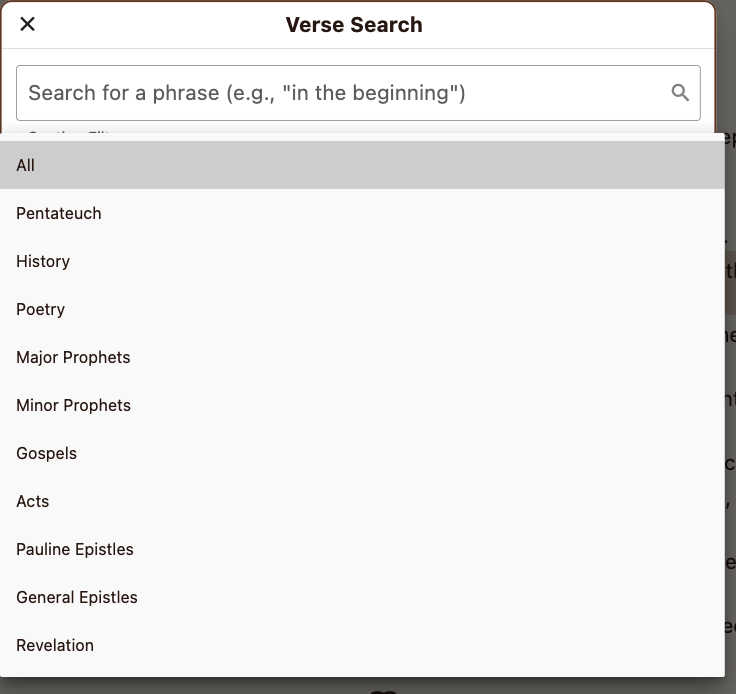
2. Use the section filter
The Section Filter lets the user limit the search to a selected part of the Bible instead of searching the whole text.
Examples include:
AllPentateuchHistoryPoetryMajor ProphetsMinor ProphetsGospelsActsPauline EpistlesGeneral EpistlesRevelation
This is one of the easiest ways to reduce very broad search results.
3. Use a wildcard
The search screen allows the use of * as a wildcard.
This can help when the user wants to search for a word pattern rather than only one exact spelling.
4. Use logical search terms
The search screen supports logical operators:
ANDORNOT
These can be used to combine or narrow ideas in the search.
Examples:
faith AND worksking OR kingdomspirit NOT evil
5. Use parentheses
Parentheses help group parts of a more complex search.
This is useful when combining multiple ideas into a single search pattern.
6. Reset the search
The Reset button clears the active search pattern so the user can begin again.
Search Tips
The on-screen guidance explains that:
- quotation marks can be used for phrases
*can be used for wildcard searchingAND,OR, andNOTcan be used for logic- searches are case-insensitive
Search Recommendation
If a search returns too many results, the best ways to narrow it are:
- use quotation marks for an exact phrase
- apply a
Section Filter - add additional terms with
AND - exclude unwanted results with
NOT
This makes Verse Search much more useful for focused study.
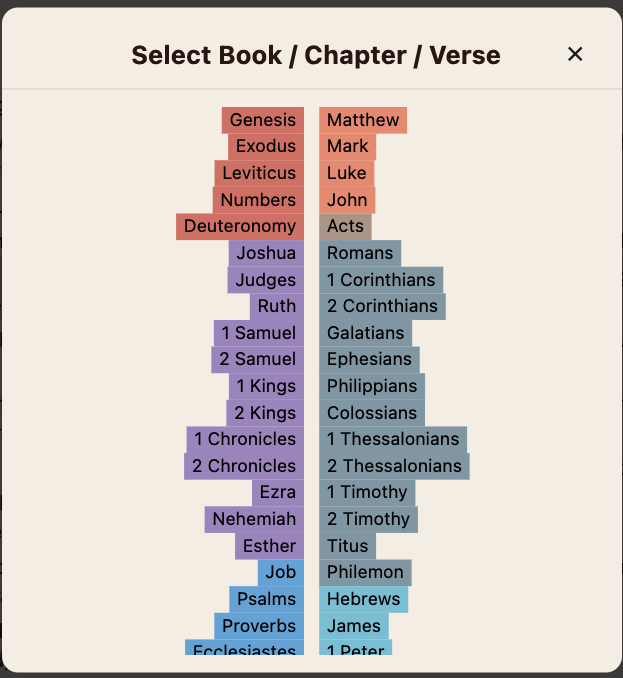
Verse Picker
The center reference area in the Bible Explorer top bar can be selected to open the verse picker.
The verse picker is used to move directly to another part of Scripture by choosing a Book, Chapter, and Verse.
At the top of the picker, the screen title reads:
Select Book / Chapter / Verse
This tells the user that the picker is designed for direct navigation to a precise Bible location.
How The Verse Picker Works
The picker is a step-by-step selection tool:
- choose the
Book - choose the
Chapter - choose the
Verse
After the desired reference is selected, the app can move directly to that passage in Bible Explorer.
This makes the picker especially useful when:
- jumping to a known Bible reference
- moving to a passage named in a sermon or study
- navigating quickly without scrolling
- switching between distant passages in different parts of the Bible
Color Groupings In The Book List
The book names in the picker are shown with different background colors.
These colors are used to visually group books of the Bible into related sections so the user can recognize broad divisions more quickly.
The colors are not the main function of the picker, but they help the user see the structure of Scripture at a glance and make navigation easier.
In practice, the color groupings help distinguish major sections such as:
- early books of the Old Testament
- historical books
- wisdom and poetry books
- prophetic books
- Gospels and other New Testament sections
- epistles and later New Testament books
The exact colors may vary depending on the app's configured group-color data, but the purpose remains the same: books that belong to the same broad section are shown with a shared visual color grouping.
Why The Color Groupings Help
The grouped colors make it easier to:
- spot related books quickly
- recognize Old Testament and New Testament transitions more easily
- move through large parts of the Bible with less visual confusion
- build a mental map of where books belong
Verse Picker Summary
The verse picker is the main direct-navigation tool for choosing a Bible location by book, chapter, and verse. Its grouped book colors are intended to help users recognize major Bible sections quickly while selecting the passage they want.
Help Button
The ? button in the top-right corner opens the interaction help dialog for Bible Explorer.
On desktop systems, this appears as Desktop Interaction Help.
This help screen explains how selection and range actions work while reading the Bible text.
Desktop Interaction Help
The desktop help dialog explains the normal interaction pattern for macOS, Windows, and Linux.
It describes the following actions:
- Left click a verse to focus or select that verse.
- Left click the same verse again to open
Verse Actionsfor the whole verse. - Right click a word to set the start of a word or range selection.
- Right click another word to set the end of the selection.
- Right click inside the highlighted selection to open
Range Actions. - Left click outside the selection to clear it and return to normal verse navigation.
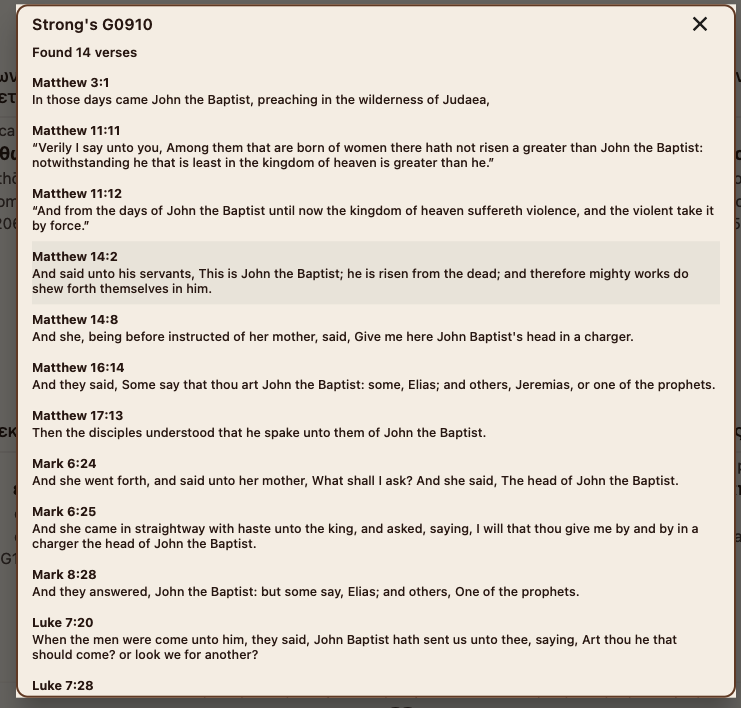
- A single-word selection may show a Strong's shortcut when that word has a mapped Strong's number.
Why The Help Button Matters
The help dialog is important because Bible Explorer includes several interaction modes that are not obvious at first glance.
It helps the user learn:
- how to select a verse
- how to open verse actions
- how to create a word or verse range
- how to open range actions
- how Strong's shortcuts may appear during word selection
Help Button Summary
Use the ? button whenever you need a quick reminder of how to interact with the Bible text. It is especially helpful when learning verse selection, range selection, and desktop study actions for the first time.
Verse Selection And Range Selection
Bible Explorer supports both single-verse selection and range selection.
These two kinds of selection are related, but they are used for different purposes.
Selecting A Verse
To select a verse, tap or click the verse once so it becomes the current focus.
Tapping or clicking the same verse again opens the actions for that single verse.
Single-verse actions are useful when the user wants to work with one verse by itself.
Selecting A Range
To select a range, begin at the first word of the desired section and then complete the selection at the last word.
On desktop systems, this is done by setting the start and end of the selection as described in the help dialog. In practical use, the result is that the text between the first and last selected words becomes highlighted as one range.
This allows the user to work with several words or verses together instead of only one verse at a time.
Range Actions
When the highlighted range is tapped or clicked again, the app opens a Range Actions menu.
This menu can include many useful actions, such as:
Copy No CitationCopy With CitationHighlightClear MarkupAdd # TagAdd $ TagAdd to MemoryReset Range
This makes range selection a powerful way to work with a section of text as one unit.
All range selections support export in multiple forms, along with markup-related actions.
In practical terms, this means a selected range can still be:
- copied without citation
- copied with citation
- highlighted
- cleared of markup
- added to tags
- sent into Bible Memory
So even when Strong's is unavailable for a larger range, the range can still be exported and marked up in useful study-friendly ways.
Highlighting A Selection
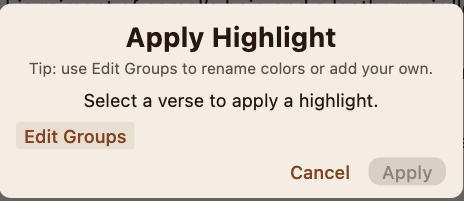
If the user chooses Highlight, the app opens the Apply Highlight dialog.
This dialog expects a verse selection before a highlight can be applied. If no usable verse selection is active yet, the app reminds the user to select a verse first.
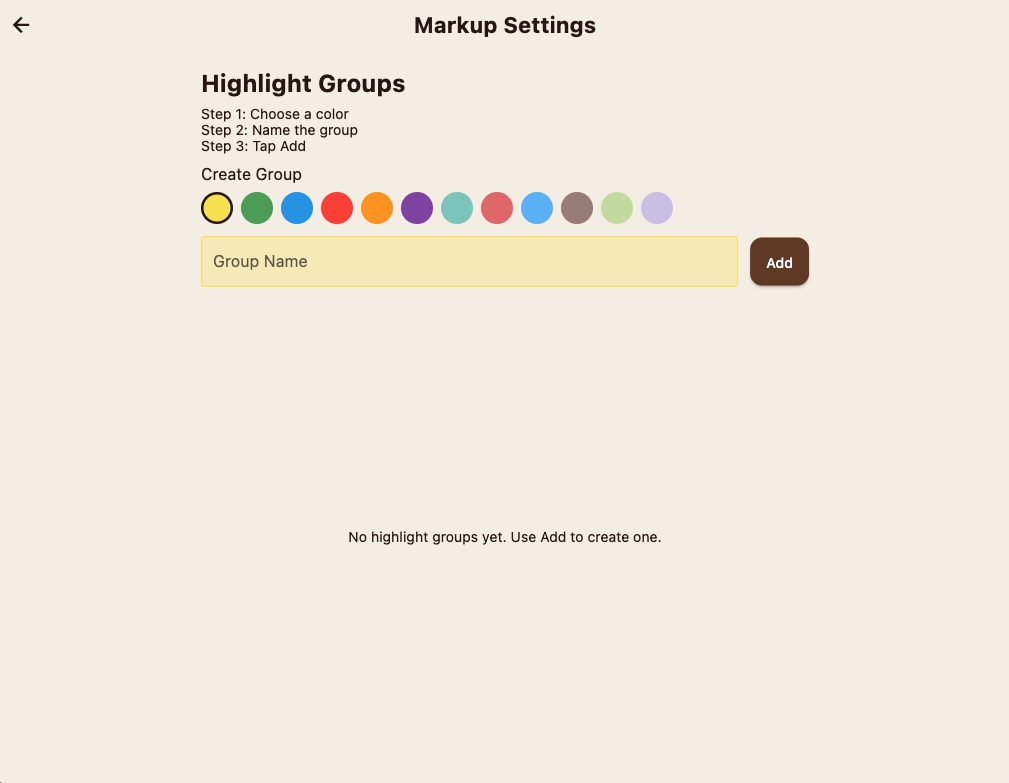
The Edit Groups button on that dialog opens Markup Settings, where the user can create and manage highlight groups.
In Markup Settings, the user can:
- choose a highlight color
- name the group
- add the group for future highlighting
This makes it possible to organize highlights by purpose, such as doctrine, prophecy, promises, or teaching use.
Why Strong's May Be Grayed Out
In a range-selection menu, the Strong's option may appear grayed out.
This is normal when the current selection is a range rather than a single mapped word.
Strong's lookups are word-based. They are intended for a single original-language word that has a mapped Strong's number. When several words or verses are selected together, there is no single Strong's entry that clearly applies to the whole range, so the Strong's action is disabled.
However, if the selected range is only one word long, the app may still allow the Strong's shortcut.
In that case, the range is effectively acting like a single-word selection, so the Strong's dictionary entry can still be opened.
In other words:
- single-word selection may allow Strong's lookup
- multi-word or multi-verse range selection may not
Topic Picker
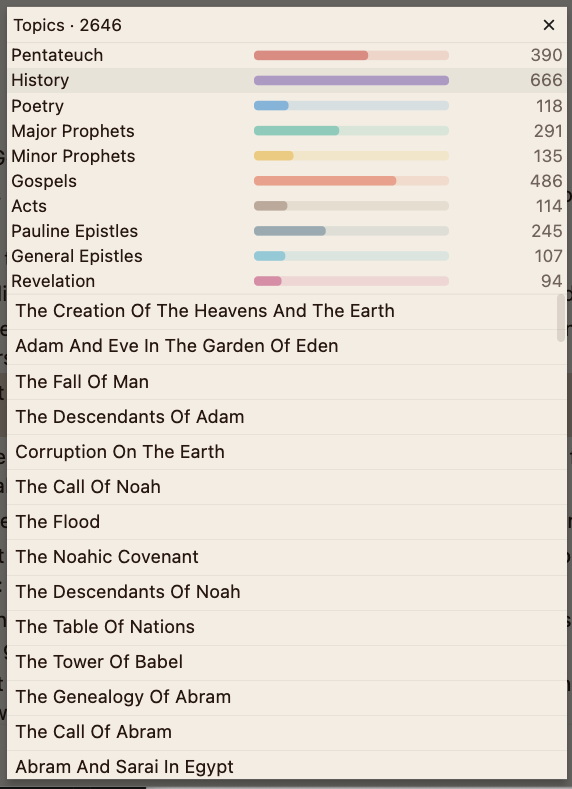
The Topics control opens the Topic Picker.
The Topic Picker is a guided topic-navigation tool that organizes Scripture topics into a large browsable structure. In the example shown, the app reports Topics · 2646, indicating that the user can browse thousands of indexed topics.
The Topic Picker is designed to help the user narrow a large topic list into a smaller and more manageable selection before opening a specific topic.
How To Narrow The Topic List
The Topic Picker can be narrowed in stages.
1. Start with a major group
At the top of the Topic Picker, broad Bible sections are shown first.
Examples include:
PentateuchHistoryPoetryMajor ProphetsMinor ProphetsGospelsActsPauline EpistlesGeneral EpistlesRevelation
Choosing one of these groups narrows the available topic list to that section of Scripture.
2. Narrow again with a subgroup or book
After choosing a major group, the picker can narrow further into a smaller set.
For example, after selecting Gospels, the user may see:
MatthewMarkLukeJohn
Selecting one of these narrows the topic list again so the user can work within that smaller portion of Scripture.
This is useful when a broad section still contains too many topics.
3. Choose a topic
Once the list has been narrowed by group and, if needed, by subgroup or book, the user can choose a specific topic title.
Examples shown in the screenshots include:
The Genealogy Of JesusThe Birth Of JesusThe Pilgrimage Of The MagiThe Baptism Of JesusJesus Begins His Ministry
Selecting a topic causes the app to navigate to the associated Bible passage in Bible Explorer.
Returning To All Topics
The All Topics control resets the narrowed view and returns the user to the full topic list.
This is helpful when the user wants to leave the current group and begin again from the full set of topics.
What Happens After You Pick A Topic
After the user selects a topic, Bible Explorer opens the corresponding passage.
In the example shown, selecting a topic under the Gospel group leads the app to a passage in Mark 2:13, where the topic heading appears in the reading area.
This allows the user to move directly from topic selection into Bible reading and study.
Why The Topic Picker Helps
The Topic Picker is useful because it:
- provides access to a large organized topic index
- helps the user narrow a very large list into smaller sections
- makes topic study easier when the user does not want to search by exact reference
- gives a direct path from topic selection to Bible Explorer
Topic Picker Summary
The Topic Picker helps the user move through a large topic index by narrowing the list step by step. First the user chooses a major Bible section, then a smaller subgroup or book if needed, then a topic. Once a topic is selected, the app navigates directly to the related passage in Bible Explorer.

Tag Lists And Study Chains
One of the most important feature areas in Bible Explorer is the tag system opened from the # button in the top-right area of the screen.
This area supports two major workflows:
# tags: shareable verse lists for study, memory work, and group use$ tags: ordered study chains for sermons, teaching, and presentation flow
The normal pattern is simple:
- gather verses with a
#tag - share, review, or organize that list
- turn the material into a
$chain when you need ordered teaching flow, notes, or presentation slides
This same study flow can also continue into Bible Memory. A user can collect verses with # tags, organize and share them, import that group into Bible Memory for recall practice, or convert the same material into a $ chain for teaching and presentation.
# Tags: Shareable Verse Lists
# tags are the best starting point when the goal is to collect verses into a named list.
They answer the question, "How do I gather, organize, and share a set of verses?"
They are especially useful for:
- personal topical study
- group Bible study
- Scripture memory
- sharing verse collections with other users
- preparing material that may later become a
$teaching chain
$ Tags: Teaching And Presentation Chains
$ tags are best when the material needs order, notes, commentary segments, or presentation flow.
They answer the question, "How do I turn a verse collection into a teachable sequence with notes and presentation structure?"
They are especially useful for:
- sermons
- classes
- guided topic lessons
- projector or overhead presentation
- slide-based teaching with notes between verses
How The Two Work Together
For many users, # and $ work together rather than separately.
A user may first gather verses with a # tag, then review or share that list, then import that same group into Bible Memory for memorization, and only later convert or rebuild the same material as a $ chain when the study becomes a fuller lesson or presentation.
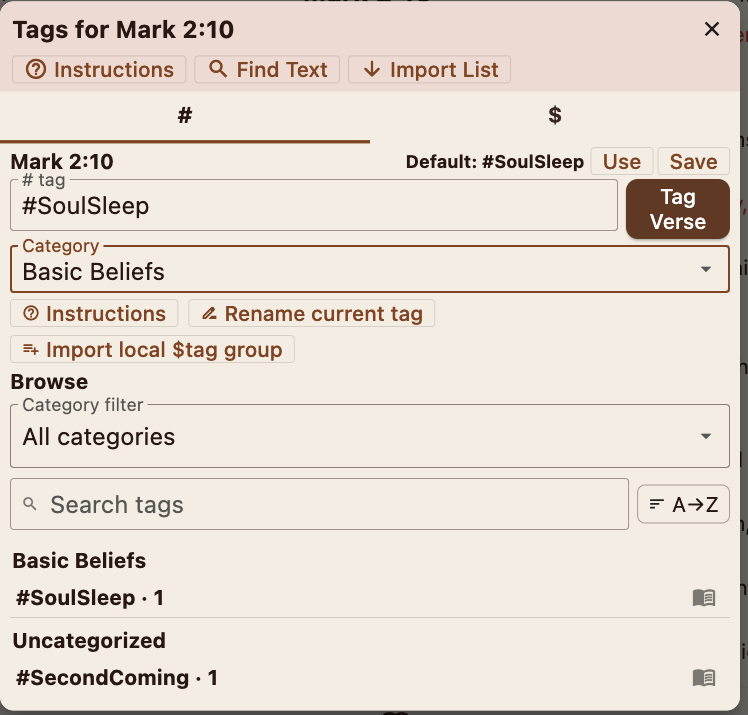
# Tags: Building And Sharing Verse Lists
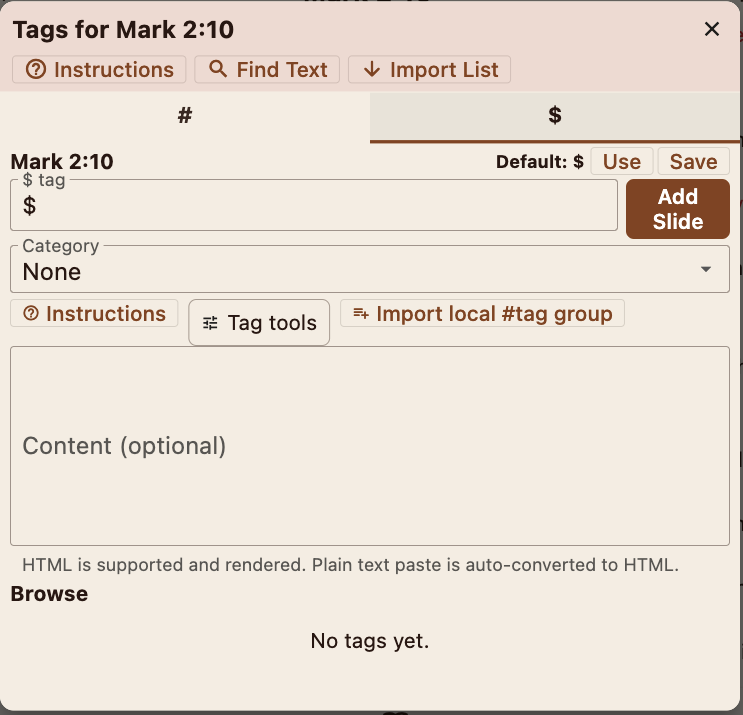
When the # button is selected, the app opens a tag dialog for the current verse. In the example shown, the dialog title is Tags for Mark 2:10.
This screen helps the user do three main things:
- choose or create a
#tag - save the current verse into that tag
- browse and manage existing verse-list tags
In simple terms, this is how to use # tags:
- choose or create a
#tag - add verses into that tag as the study grows
- review, export, share, or reuse that saved list later
What # Tags Are For
# tags are designed for collecting and organizing verse lists.
They are especially useful for:
- personal study lists
- group-study verse collections
- memory verse lists
- topical verse sets
- simple shareable Scripture lists
In practice, # tags are often the first step in Bible sharing. A user can gather verses under one tag, share that list with other people, and later reuse the same list in Bible Memory or convert it into a $ tag chain for teaching or presentation.
Top Controls On The # Screen
At the top of the tag dialog, several controls help the user begin working with the current verse.
Instructions
The Instructions button opens help for the tag system.
For # tags, the help explains that these tags are ideal for collecting and organizing verse lists, especially for personal study, group study, memory work, topical lists, and shared reference sets.
Find Text
The Find Text button helps search within tag-related material.
Use it when you want to locate specific text connected with tag content more quickly.
Import List
The Import List button is used to bring a shared list into the app.
This is one of the main sharing features of the # tag system because one person can prepare a verse list and another person can import it for personal or group use.
Lists created by other users can be imported from the clipboard when they have been shared in the app's supported list format.
This makes it possible for one person to prepare a Scripture list and for another person to paste or import that same list into their own app.
Choosing Or Creating A # Tag
Near the top of the dialog, the current verse reference is shown, followed by a # tag entry field.
The user can:
- type a new
#tagname - select an existing tag
- use the default tag name shown by the app
Nearby controls include:
Use: applies the selected tag name as the active tagSave: saves the active tag choiceTag Verse: adds the current verse to the chosen#tag
This makes the basic workflow simple:
- Enter or choose a
#tagname. - Save the current verse into that
#tag. - Continue adding verses to grow the list.
- Browse the list later for review, export, or reuse.
Worked Example: #SoulSleep
As a simple example, a user could build a tag named #SoulSleep.
This would create a plain verse list for passages the user wants to study in connection with that topic.
A basic workflow might look like this:
- Navigate to a verse the user wants to include in the study.
- Open the
#tag screen. - Type
#SoulSleepin the tag field. - Select
Useso#SoulSleepbecomes the active tag. - Select
Saveto keep that tag name available in the tag list. - Select
Tag Verseto save the current verse into the#SoulSleeplist. - Move to the next related verse and repeat the process.
Over time, the #SoulSleep tag becomes a collected verse list that can be reviewed, shared, exported, or used in other app tools.
After Use and Save, the screen may show Default: #SoulSleep, indicating that this is now the active default tag for continued tagging.
This example also shows why # tags are often the best first step. The user does not need to build a full presentation or note sequence at the beginning. The first goal is simply to gather the relevant verses into one reusable list.
The user can continue building the list in two main ways:
- import a shared list created by someone else
- search for new Bible text and add more matching verses to the tag
This allows the same tag to grow either from shared study material or from the user's own continuing Bible study.
Step-By-Step: Create And Build A # Tag
Use this sequence when the goal is to create a verse list and keep adding to it.
- Open Bible Explorer and navigate to the first verse you want to save.
- Tap the
#button to open the tag dialog for that verse. - In the tag field, type the tag name you want to use, such as
#SoulSleep. - Tap
Useso that tag becomes the active working tag. - Tap
Saveso the tag name is stored in your saved tag list. - Tap
Tag Verseto place the current verse into that tag. - Move to the next verse you want, open the
#dialog again, and tapTag Verseagain while the same tag is active. - Repeat until the verse list is complete.
Picture guide:
- Use manual_images/sorted/09-verse-search-soulsleep-results.png to see how an active
#tag can be used while building the list from search results. - Use manual_images/sorted/11-new-category-basicbeliefs.png if you also want to create a category for the tag.
- Use manual_images/sorted/08-tag-hash-soulsleep-categorized.png to confirm that the saved tag now appears in the browse area.
- Use manual_images/sorted/10-hash-list-review.png to review, reorder, or export the finished list.
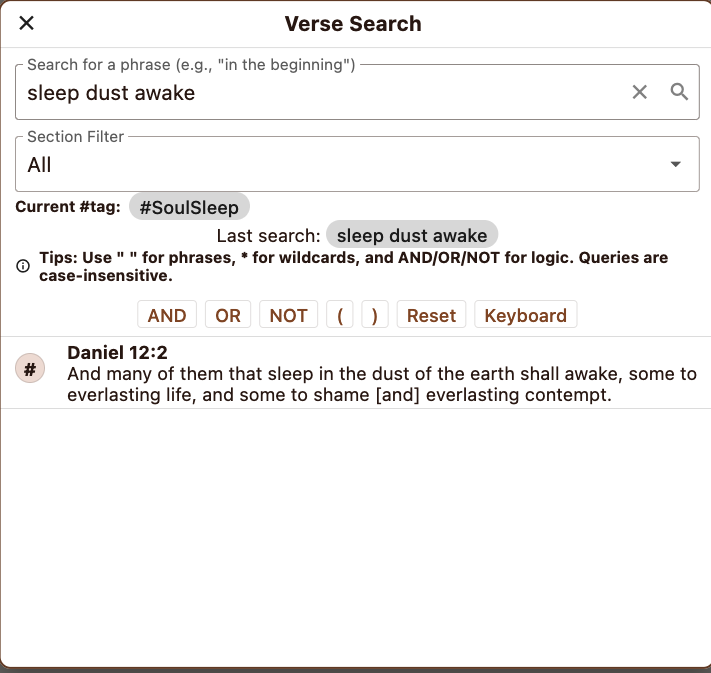
Example: Search And Add To #SoulSleep
The Verse Search screen can also be used to grow a #tag list directly.
In the example shown, the active tag is #SoulSleep, and the user searches for the phrase:
sleep dust awake
The search finds a matching verse, such as Daniel 12:2.
When a result includes the # control beside it, the user can tap that # to add the found verse directly to the active #tag list.
This makes search especially useful for topic building:
- Set the current
#tag, such as#SoulSleep. - Search for related words or phrases.
- Review the matching verses.
- Tap the
#beside a matching verse to add it to the list.
This is one of the fastest ways to build a topical verse collection from search results.
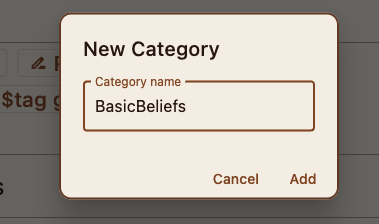
#SoulSleepExample: Creating A Category
If the user wants to organize related tags together, a category can also be created.
For example, after creating #SoulSleep, the user might create a category named BasicBeliefs.
A simple workflow is:
- Open the category control on the
#tag screen. - Choose the option to create a new category.
- Enter a category name such as
BasicBeliefs. - Select
Add.
After that, the new category can be used to group related tags together.
In this example, #SoulSleep could be placed under BasicBeliefs so it is easier to find later along with other doctrinal or study-list tags.
When the category has been applied, the browse area will show the tag under that category heading. In the example shown, #SoulSleep now appears under Basic Beliefs with its verse count, instead of remaining in the uncategorized list.
Categories
The Category field allows a #tag to be placed into a category.
Categories help keep related verse lists together. For example, a user may keep separate categories for prophecy, group Bible study, memory work, or sermon preparation.
Additional tools on this part of the screen include:
Instructions: opens tag helpRename current tag: changes the name of the currently selected tagImport local $tag group: pulls verse references out of a$tagchain into a plain#tagverse list
This last option is useful when a structured teaching chain needs to be turned back into a simpler shared verse list.
Browsing Existing # Tags
The lower part of the screen is the browse area for saved tags.
It includes:
Category filter: narrows the visible tags by categoryAll categories: shows the complete list againSearch tags: searches within saved tag namesA->Z: sorts the visible list alphabetically
Below the browse tools, the user sees saved tags and their verse counts. In the example shown, the list includes an uncategorized entry named #SecondComing with a count beside it.
This area helps the user quickly find an existing study list, review it, and continue working with it.
Each saved tag row also includes a read button on the right side. This lets the user open and review the verses saved under that tag.
This means the browse area is not only for locating saved tags. It is also the place where the user can reopen a collected verse list and read through it again as a study set.
Saved lists can be found several ways:
- by browsing category headings
- by using the category filter
- by searching for a tag name
- by sorting the visible list alphabetically
This makes it easier to find older study sets even when many tags have already been created.
# TagReviewing A Saved # List
When the user opens a saved # list, the app shows the verses collected under that tag as a reviewable set.
In the example shown, the list is #SoulSleep, and the screen title shows:
#SoulSleep • 1 verses
From this screen, the user can do more than simply read the saved verses. The list can also be managed for study, sharing, and presentation use.
Main Actions On The Review Screen
Slide Order
The Slide Order area lets the user adjust the order of the saved verses.
Up and down arrows can be used to move selected entries higher or lower in the list. This helps when the user wants verses to appear in a teaching order rather than only in the order they were first added.
Make Default
The Make default control sets the selected # list as the default list for further tagging.
This is especially useful when the user plans to continue adding more verses to the same study topic without reselecting the tag each time.
Video / Presentation View
The review screen also includes a presentation-style view that can display the saved list as large text slides.
This is an important use for teachers, speakers, and group leaders who present Bible material on overhead screens, projectors, or other large displays.
In this mode, each saved verse can be shown clearly as a readable slide for group viewing.
Delete A Single Verse
Each saved verse row includes a delete control.
This allows the user to remove one verse from the list without deleting the entire tag.
Delete The Entire # List
The review tools also allow the user to delete the entire # tag list when it is no longer needed.
This removes the list as a saved study set.
Export To Clipboard
The list can be exported to the clipboard in a formatted sharing layout.
This makes it easy to pass a study list to another user, paste it into notes, or share it in a way that another Biblical Heritage #StudyBible user can import later.
An exported list may appear in a format such as:
*The following is a formatted sharing list for use in the Biblical Heritage #StudyBible app. Learn more at BiblicalHeritage.net for tutorials, downloads, shared lists, and related links.*

#SoulSleep (1 verses)

Daniel 12:2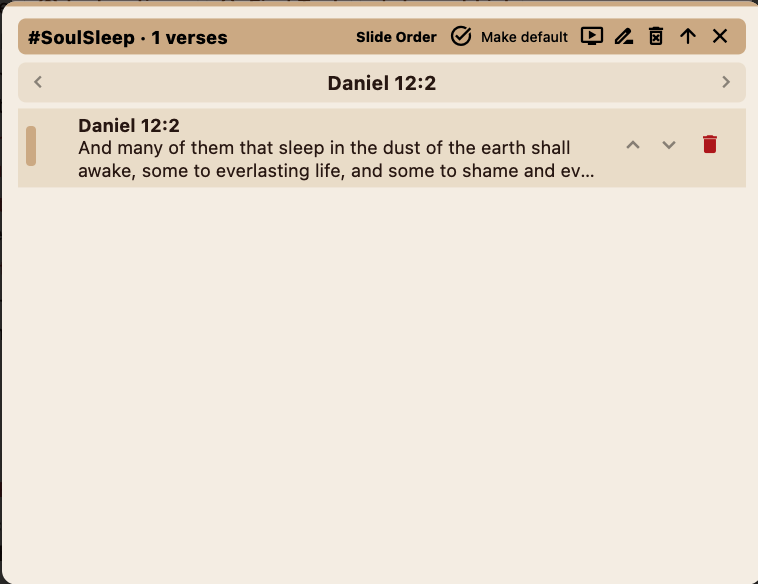
# ListThis formatted clipboard export helps preserve the tag name and verse references in a consistent sharing format.
Why Review Mode Matters
The review screen is important because it turns a simple collected verse list into a practical study and presentation tool.
From one place, the user can:
- review the saved references
- reorder the verses
- keep the list as the default active tag
- present the verses in large-text slide form
- export the list for sharing
- delete single verses or the whole list
This makes # tags useful not only for collecting verses, but also for organizing and presenting them.
Why # Tags Matter
The # tag system is one of the most important features in the app because it supports a practical Bible-sharing workflow:
- collect verses into a clear list
- organize them by tag and category
- share or import lists for group use
- reuse those lists in other study tools
- grow a simple list into a more structured
$study chain when needed
For many users, this is where Bible sharing begins.
# Tag Summary
Use the # tag screen to gather verses into named lists, organize those lists by category, and share them with others. # tags are usually the simplest starting point for topical study and group Bible sharing, and they can later be turned into $ study chains when the material needs a more ordered teaching flow.
$ Tags: Teaching And Presentation Chains
The $ tag screen works much like the # tag screen, but it is designed for a more structured teaching flow.
The main difference is that a $ tag can include note content in addition to the saved verses.
In simple terms:
# tagscollect verses into a simple list$ tagsbuild an ordered study chain that can also include notes
Use $ tags when the goal is not only to collect verses, but to arrange them into a sequence for teaching, preaching, note-taking, and presentation.
How $ Tags Compare To # Tags
The overall workflow is very similar.
On the $ side, the user can still:
- enter a tag name
- set a default tag
- save the tag
- assign a category
- browse saved tags
- import a related local tag group
However, the $ side adds a content area for notes or slide material.
This allows the user to create a guided teaching or presentation sequence rather than only a plain list of verses.
Main Controls On The $ Screen
The $ tag screen includes controls similar to the # side:
InstructionsFind TextImport ListUseSave- category controls
It also includes:
Add Slide: adds the current verse or slide entry into the$chainTag tools: opens additional tools related to the ordered tag workflowImport local #tag group: pulls an existing plain#verse list into a$study chain
This makes it easy to begin with a plain # list and later turn that list into a more formal study or presentation sequence.
Content Area
The largest difference on the $ screen is the Content (optional) area.
This note area allows the user to enter additional text that belongs with the saved slide or verse.
That content may be used for:
- teaching notes
- commentary
- transition text between verses
- presentation notes
- note-only slide material
The screen also explains that HTML is supported and rendered, and that plain text paste is auto-converted to HTML.
Worked Example: Import #SoulSleep Into A $ Tag
One of the most useful $ workflows is to begin with a simple # verse list and then import that list into the $ side.
In this example, the user has already created the #SoulSleep list on the # side.
To begin turning that material into a teaching or presentation sequence:
- Open the
$tag screen. - Create or choose the
$tag that will hold the study chain. - Select
Import local #tag group. - In the import dialog, choose the local
#SoulSleepgroup. - Select
Import.
This pulls the verses from the plain #SoulSleep list into the $ workflow.
At present, importing the local # group should make the imported $ tag the default tag, but this is a known bug and may not happen automatically in the current version.
For now, if the imported $ tag does not become the default on its own, simply select that tag and use Make default or the equivalent default-tag control to set it manually.
At that point, the study is no longer only a simple verse list. It becomes an ordered chain that can be expanded with notes, slide order changes, and presentation use.
$ Tag
# GroupStep-By-Step: Turn A # Tag Into A $ Teaching Chain
Use this sequence when you already have a verse list and now want to teach from it.
- First build the verse list on the
#side and confirm it is saved. - Open the
$tag screen. - Type a new
$tag name or select an existing$tag for the lesson. - Tap
UseandSaveso that$tag becomes the active study chain. - Tap
Import local #tag group. - Select the
#tag you want to convert, such as#SoulSleep. - Import the group so its verses become slides in the
$chain. - If needed, set the imported
$tag as the default manually. - Open the new
$chain and begin arranging slide order. - Add notes, commentary segments, or transition text in the
Contentarea. - Review the chain in presentation mode when the lesson is ready.
Picture guide:
- Use manual_images/sorted/15-dollar-tag-create.png for the initial
$tag setup. - Use manual_images/sorted/12-import-local-hash-group.png for the import step from
#into$. - Use manual_images/sorted/13-dollar-study-chain-empty-notes.png to see the imported chain before notes are added.
- Use manual_images/sorted/14-dollar-study-chain-with-notes.png to see the same chain after study notes have been added.
- Use manual_images/sorted/16-presentation-scripture-plus-notes.png, manual_images/sorted/17-presentation-note-only.png, and manual_images/sorted/18-presentation-scripture-only.png to compare presentation outputs.
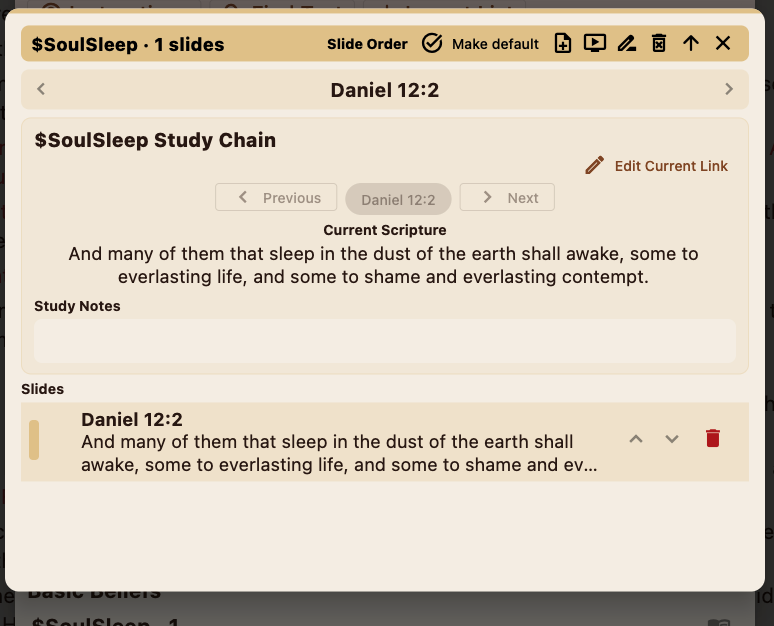
Working Inside A $ Study Chain
After the import is complete, the user can open the $ study chain screen.
In the example shown, the chain is $SoulSleep, and the screen title shows:
$SoulSleep • 1 slides
This screen is where the user begins working with the ordered study chain itself.
What This Screen Shows
The $ study-chain screen brings together several parts of the lesson or presentation:
- the current verse reference
- the current Scripture text
- a study-notes area
- the ordered slide list
This is also the screen where commentary segments or teaching notes can begin to be used alongside the verse chain.
Study Notes And Commentary Segments
The Study Notes area allows the user to place additional material alongside the selected verse.
This can be used for commentary segments, teaching notes, explanatory remarks, or transition material between one verse and the next.
That is one of the most important differences between a simple # list and a $ study chain:
- a
#list mainly gathers verse references - a
$chain allows those verses to be supported by notes and commentary segments
$ Study Chain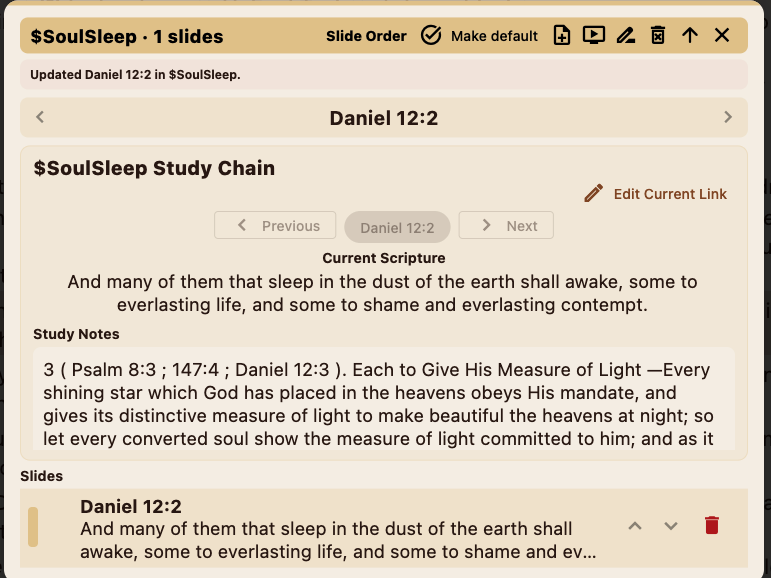
$ Study Chain With NotesMain Controls On The $ Study-Chain Screen
The screen includes:
Slide Order: used to reorder the saved slidesMake default: sets this$tag as the default active study chain- presentation and editing tools in the top row
Edit Current Link: used to edit the selected slide or current connection in the chainPreviousandNext: move between slides in the chainSlides: shows the saved slide list below
Each slide row can also be managed with controls such as:
- move up
- move down
- delete
This allows the chain to be shaped into a clear teaching order.
Why This Screen Matters
This screen is where a verse list begins to become a true lesson or presentation.
After importing a plain # group such as #SoulSleep, the user can use this screen to:
- preserve the ordered verse chain
- add commentary or note segments
- review the current Scripture in context
- reorder the chain for teaching
- prepare the material for live presentation or group study
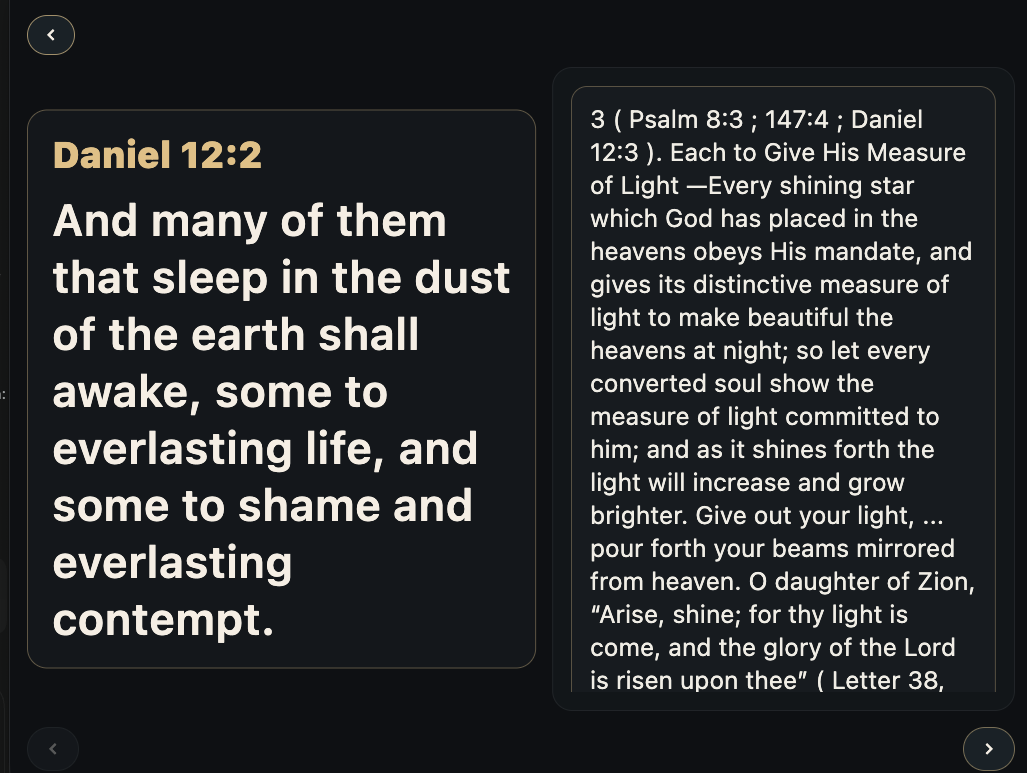
Dynamic Slide Presentation
The slide presentation for a $ study chain is dynamic. It adapts to the combination of Scripture text and note content saved in the chain.
Depending on what has been added to the current slide, the presentation may show:
- Scripture text by itself
- Scripture text together with commentary or study notes
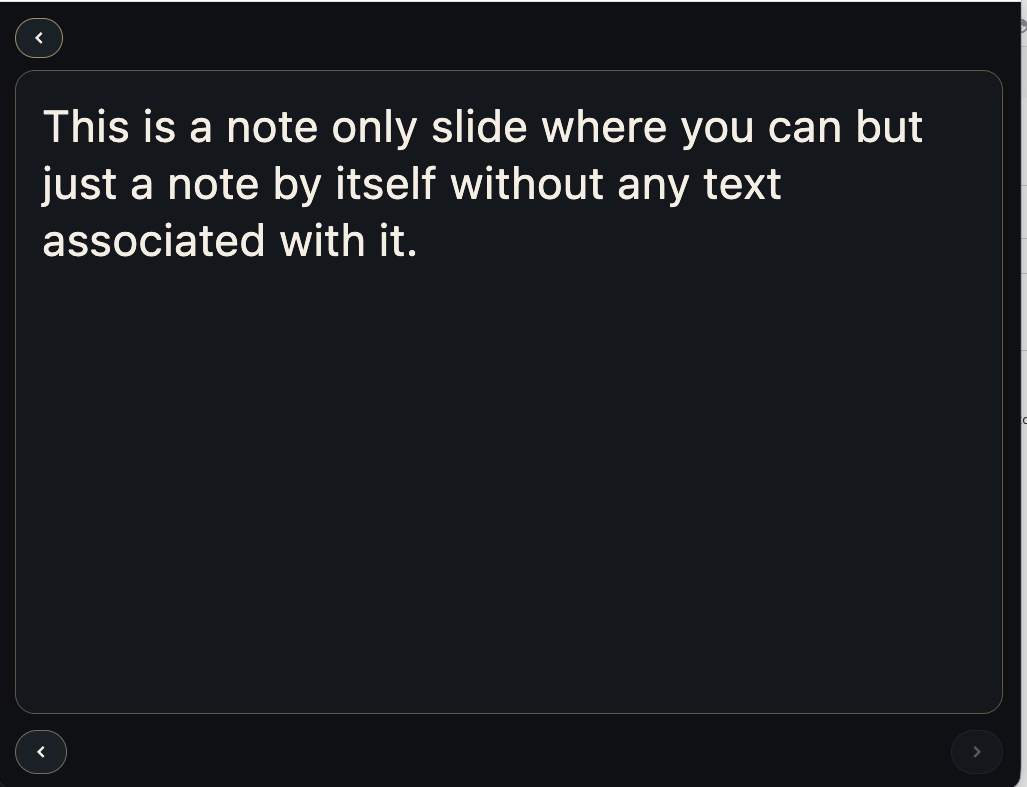
- a note-only slide without any Bible text attached
This makes the $ system flexible for teaching and group presentation.
For example:
- one slide may show
Daniel 12:2on the left with commentary text on the right - another slide may show only a note or transition statement
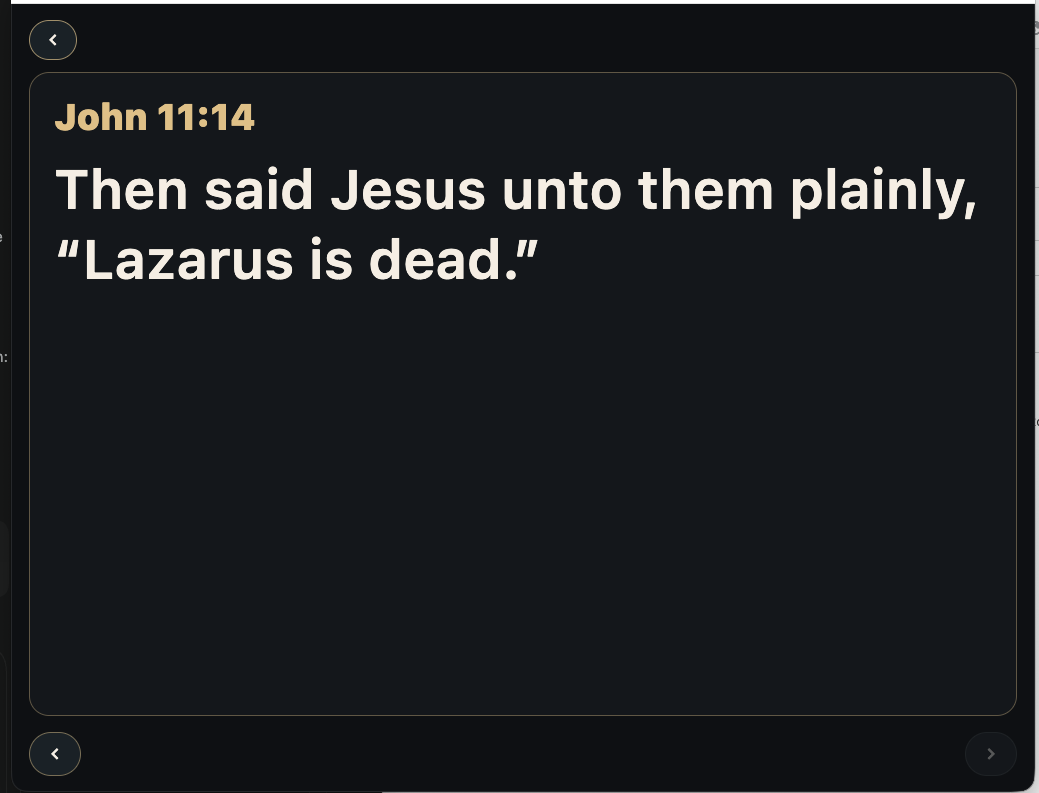
- another slide may return to a full Scripture-only presentation such as
John 11:14
This allows the speaker or teacher to move naturally between Bible text, explanatory commentary, and note-only transition slides without leaving the study chain.
Why Dynamic Presentation Helps
This dynamic behavior is especially valuable for overhead screens, projectors, video recording, or live teaching.
It allows the same $ chain to function as:
- a Scripture presentation
- a teaching outline
- a commentary-supported lesson
- a sequence with transition slides between key verses
In other words, the slide presentation adapts to the lesson material instead of forcing every slide to use the same structure.
Export And Sharing For $ Tags
The export function also works on the $ side.
This means a completed $ study chain can be copied to the clipboard and shared in a formatted text layout that preserves the ordered slide sequence and any notes attached to those slides.
This is important because it allows one user to prepare a full study chain, including commentary segments and note-only slides, and then share that chain with another user.
An exported $ chain may appear in a format such as:
*The following is a formatted sharing list for use in the Biblical Heritage $StudyBible app. Learn more at BiblicalHeritage.net for tutorials, downloads, shared lists, and related links.*

$SoulSleep (3 slides)

Daniel 12:2
Notes:
3 ( Psalm 8:3 ; 147:4 ; Daniel 12:3 ). Each to Give His Measure of Light —Every shining star which God has placed in the heavens obeys His mandate, and gives its distinctive measure of light to make beautiful the heavens at night; so let every converted soul show the measure of light committed to him; and as it shines forth the light will increase and grow brighter. Give out your light, ... pour forth your beams mirrored from heaven. O daughter of Zion, “Arise, shine; for thy light is come, and the glory of the Lord is risen upon thee” ( Letter 38, 1890 ).

Note Slide 2
Notes:
This is a note only slide where you can but just a note by itself without any text associated with it.

John 11:14
This export format shows the difference between the two tag types clearly:
- a
#export shares a simple verse list - a
$export shares an ordered slide chain that may also include notes
That makes $ exports especially useful for teaching teams, group-study leaders, and anyone who wants to pass along a prepared presentation sequence rather than only a list of references.
Finding Saved Lists
Saved # and $ lists can be found in several ways depending on how the user prefers to work.
Common methods include:
- browsing the visible saved-list area
- narrowing by category
- searching by tag name
- sorting the list into a clearer order
This is helpful when the user has built many topics over time and wants to reopen one quickly for editing, presentation, or sharing.
Why $ Tags Matter
$ tags are especially useful when a study grows beyond a simple verse list and needs order, commentary, or presentation flow.
They are well suited for:
- sermons
- classes
- group Bible studies
- guided topic presentations
- overhead-screen or projector use
A user might begin with a # list for collecting verses, then convert or rebuild that material as a $ tag when notes and presentation order become important.
$ Tag Summary
Use $ tags when a saved verse collection needs order, notes, and presentation flow. A common pattern is to gather material first with # tags, move into $ tags when the study becomes a lesson or sermon, and use Bible Memory when the goal is recall and repeated review rather than presentation.
The $ tag system works much like the # tag system, but with the added ability to include note content. Use # tags for simple verse lists, and use $ tags when the same study needs ordered slides, notes, or presentation flow.
Bible Explorer Bottom Bar
The bottom bar contains quick tools for moving through the reading and study experience.
These controls include history, text-size adjustment, commentary access, and additional reading or study tools.
History
The History button opens a list of recently visited passages.
When selected, it shows the recent references the user has opened in Bible Explorer, along with the time each one was visited.
This makes it easy to:
- return to a passage that was opened earlier
- move back to a verse that was part of the current study session
- revisit a recently viewed reference without searching for it again
Selecting an item from the history list takes the user back to that passage.
Even though the History button is fairly self-explanatory, it becomes especially useful during longer study sessions when the user has moved through many references and wants to return quickly to one that was just viewed.
Text Size: A- and A+
The A- and A+ controls change the reading size of the Bible text.
These buttons are used when the reader wants the text to appear smaller or larger on the screen.
A-: reduces the text sizeA+: increases the text size
This makes Bible Explorer easier to adapt for:
- personal reading comfort
- larger desktop displays
- smaller screens
- teaching situations where the text needs to be easier to see from a distance
When the user selects one of these controls, the current passage remains in view, but the text is redrawn at the new size.
This allows the user to keep reading the same section of Scripture while adjusting the display for comfort or visibility.
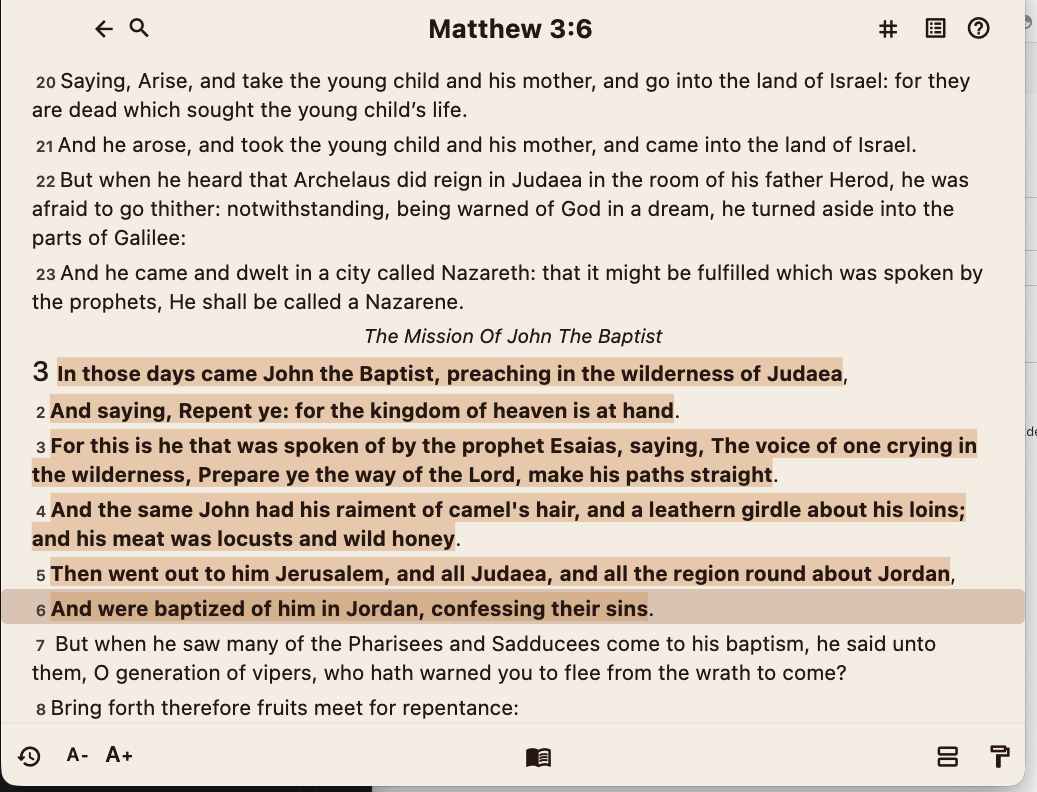
Commentary Button
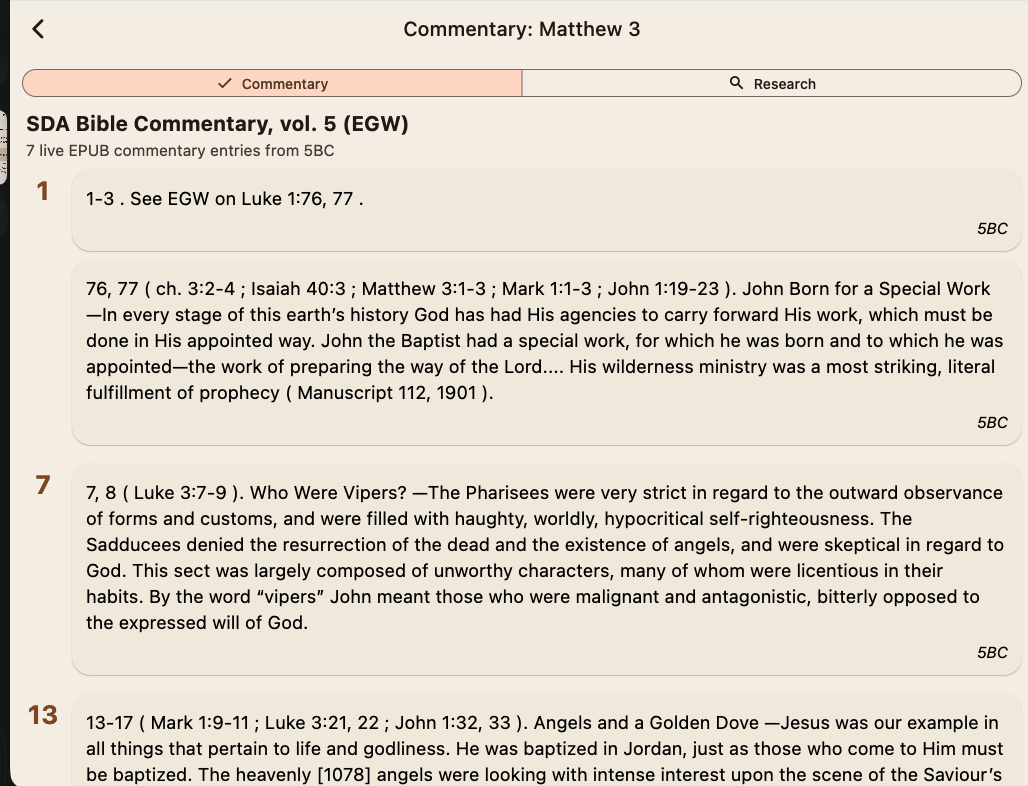
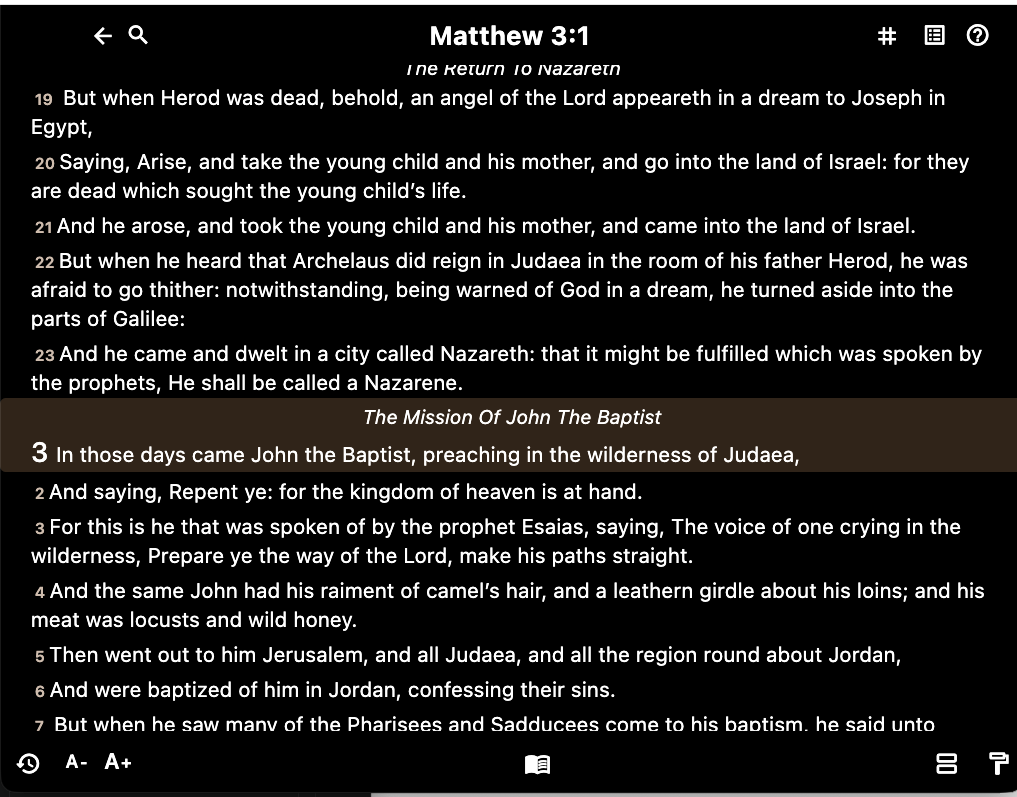
The center button on the bottom bar opens the commentary and research panel for the current passage.
This is the main place where the user can see related commentary material connected with the verse or chapter currently being read.
For example, when the reader is at Matthew 3:1, the panel may open as Commentary: Matthew 3.
Commentary And Research Tabs
The commentary panel has two related views:
CommentaryResearch
These two views help keep recognized commentary material separate from other imported reading material.
Commentary
The Commentary side shows commentary entries that belong to the managed commentary library.
In the example shown, the app displays:
SDA Bible Commentary, vol. 5 (EGW)- live EPUB commentary entries from
5BC
These entries are treated as commentary matches for the current passage.
This is the most direct commentary view, because it shows commentary material that the app recognizes as belonging in the commentary library.
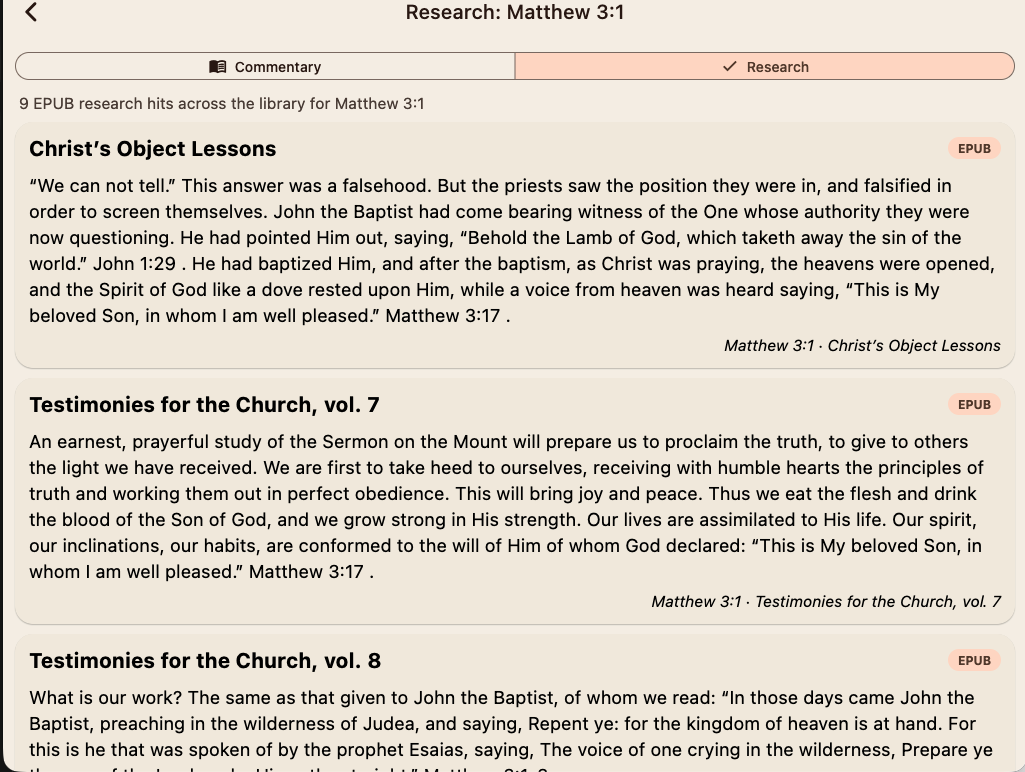
Research
The Research side shows related hits from other imported EPUB or PDF files stored in the research library.
These are not necessarily formal commentary volumes, but they may still contain material related to the current passage.
For example, after the user imports additional EPUB files into the research library, the app may show related results such as:
Christ's Object LessonsTestimonies for the Church, vol. 7Testimonies for the Church, vol. 8
This means that once other EPUB or PDF books have been imported, the app can surface additional related reading that may help explain or expand the current passage.
Why Both Views Matter
This two-part design is important because not every useful book belongs in the formal commentary library.
The app keeps the two kinds of material separate:
- recognized BC commentary files stay in the
Commentarylibrary - other imported EPUB/PDF books are routed into the
Researchlibrary
But when a passage is being studied, both types of material may still be helpful.
So the commentary button becomes a bridge:
- it shows direct commentary when commentary exists
- it also reveals other imported books that may relate to the same Scripture
Research Library Connection
This behavior depends on the files the user has already imported through Commentary Library Setup.
If the user adds other EPUB or PDF files to the research library, those files may begin to appear on the Research side when the current passage has matching material.
This allows the user to move beyond one formal commentary source and compare the passage with other imported books that may also shed light on the same verses.
Commentary Button Summary
Use the commentary button to open passage-related reference material. The Commentary tab shows recognized commentary entries, while the Research tab can show related material from other imported EPUB or PDF books. Together, these views help the user study the passage from both commentary and broader research sources.
Mode And Theme Menu
The bottom-right control opens a menu for additional reading and study options.
In the screenshots shown, this menu includes:
Bible MemoryInterlinear ModeTheme
This menu gathers together one memory tool, one original-language study tool, and the theme selector for the reading screen.
Theme Selector
The bottom choice in this menu is the theme selector.
This works much like the theme selection described earlier in the app. It allows the user to change the current reading appearance without leaving Bible Explorer.
For example, the user may switch to a theme such as Sepia or Night, depending on the themes available in the current app version.
This gives the reader another quick way to adjust the look of the Bible text while staying in the main reading view.
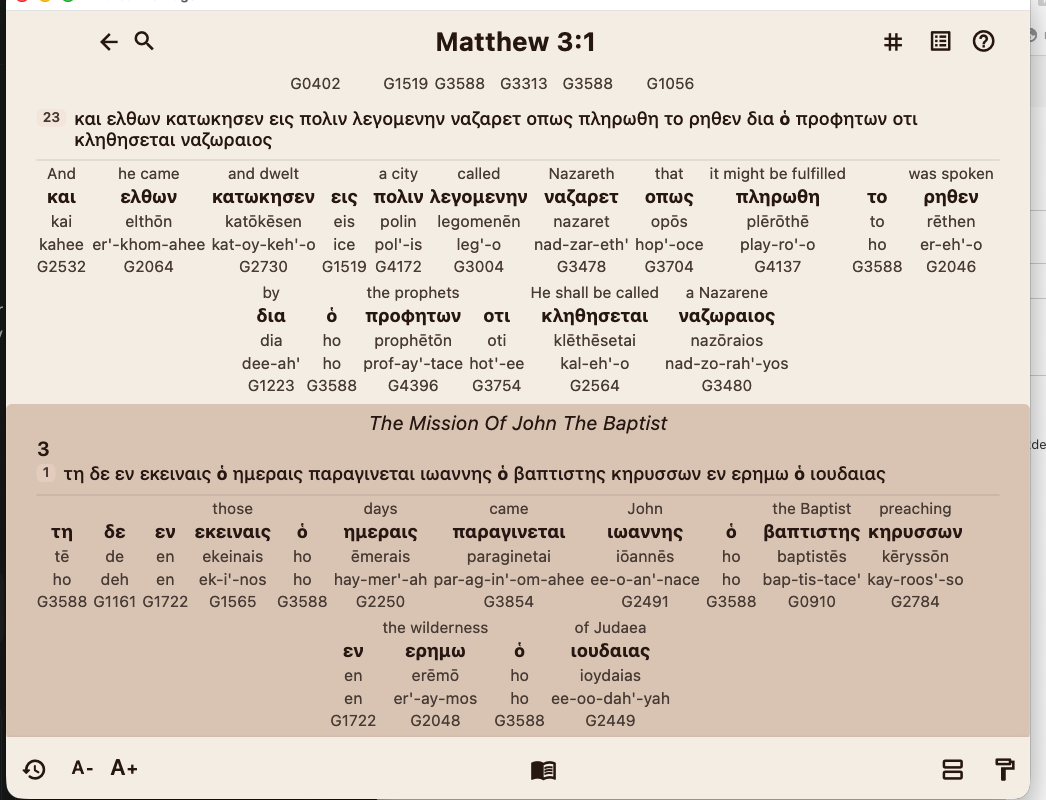
Interlinear Mode
The middle choice in the menu is Interlinear Mode.
This opens the ancient-language display options for the current passage.
When interlinear mode is enabled, the passage is shown with stacked original-language study information rather than only the normal English reading view.
Depending on the selected options, the stacked display may include:
- the English gloss
- the ancient text
- transliteration
- pronunciation
- Strong's number
- morphology
In the example shown, the visible stacks display the transliteration, pronunciation, and Strong's number along with the original-language text.
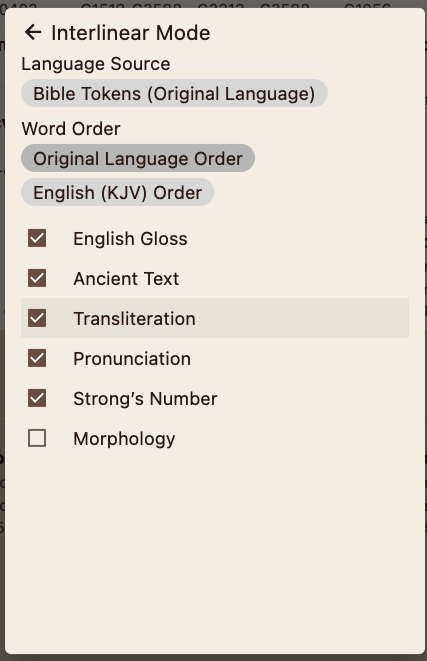
Interlinear Options
The interlinear options screen allows the user to choose how the original-language material is shown.
The menu shown in the screenshots includes:
Language Source:Bible Tokens (Original Language)Word Order:Original Language OrderorEnglish (KJV) OrderEnglish GlossAncient TextTransliterationPronunciationStrong's NumberMorphology
This lets the user simplify the display or make it more detailed depending on the type of study being done.
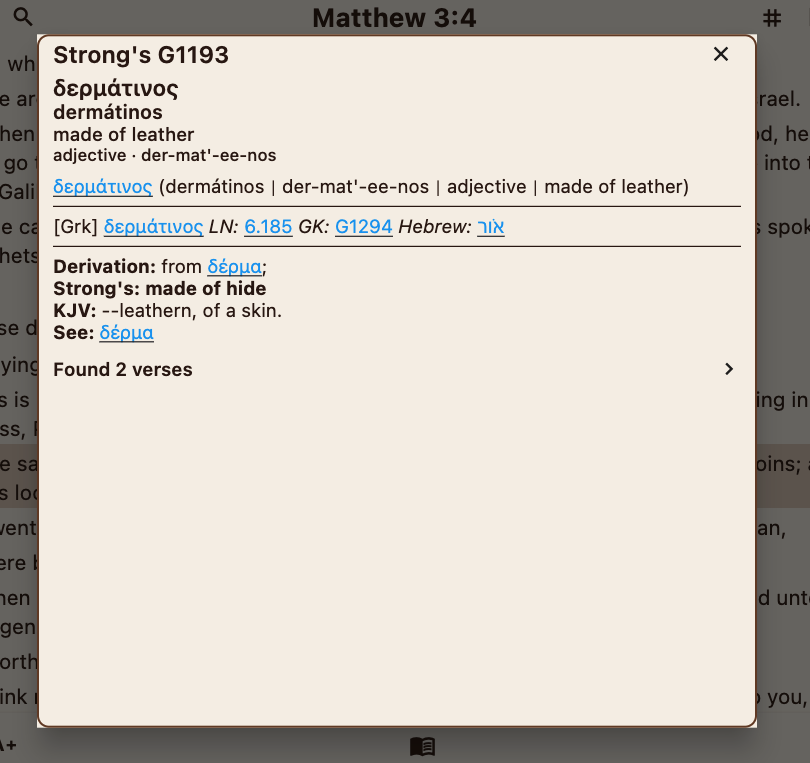
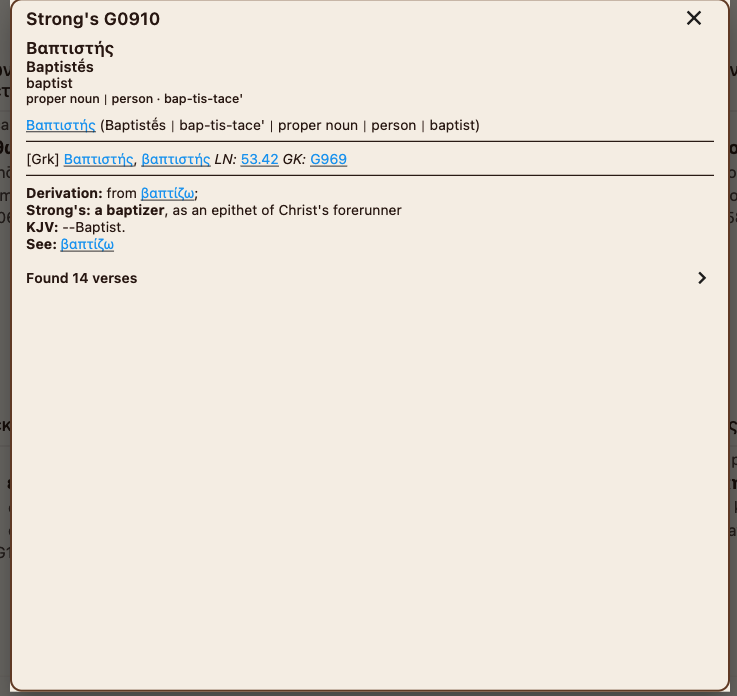
Opening The Dictionary
When interlinear mode is active, tapping a Strong's number or tapping the related word opens the dictionary entry for that word.
This dictionary view shows information such as:
- the Strong's number
- the original-language form
- transliteration
- pronunciation
- brief lexical definition
- related references
This makes the interlinear display interactive rather than only visual.
Related Verse List
The dictionary entry also includes a selector or results area showing other places where the same Strong's entry appears.
When the user taps that list selector, the app reveals additional verse locations connected with that word.
Tapping one of those listed locations navigates directly to that verse.
This allows the user to move from one word study into a broader Scripture comparison by following where the same original-language word appears elsewhere.
Why Interlinear Mode Matters
Interlinear mode is especially valuable for users who want to study the ancient text more closely.
It helps the reader:
- compare English wording with the original-language text
- see transliteration and pronunciation
- follow Strong's-number links into dictionary entries
- navigate to other verses that use the same word
This makes the bottom-right menu one of the most important study-tool entry points in Bible Explorer.
Bible Memory
The top choice in the bottom-right menu is Bible Memory.
Bible Memory is designed to help the user hide Scripture in the heart through gradual recall and repeated review.
It works especially well with verse groups that have already been collected through # tags.
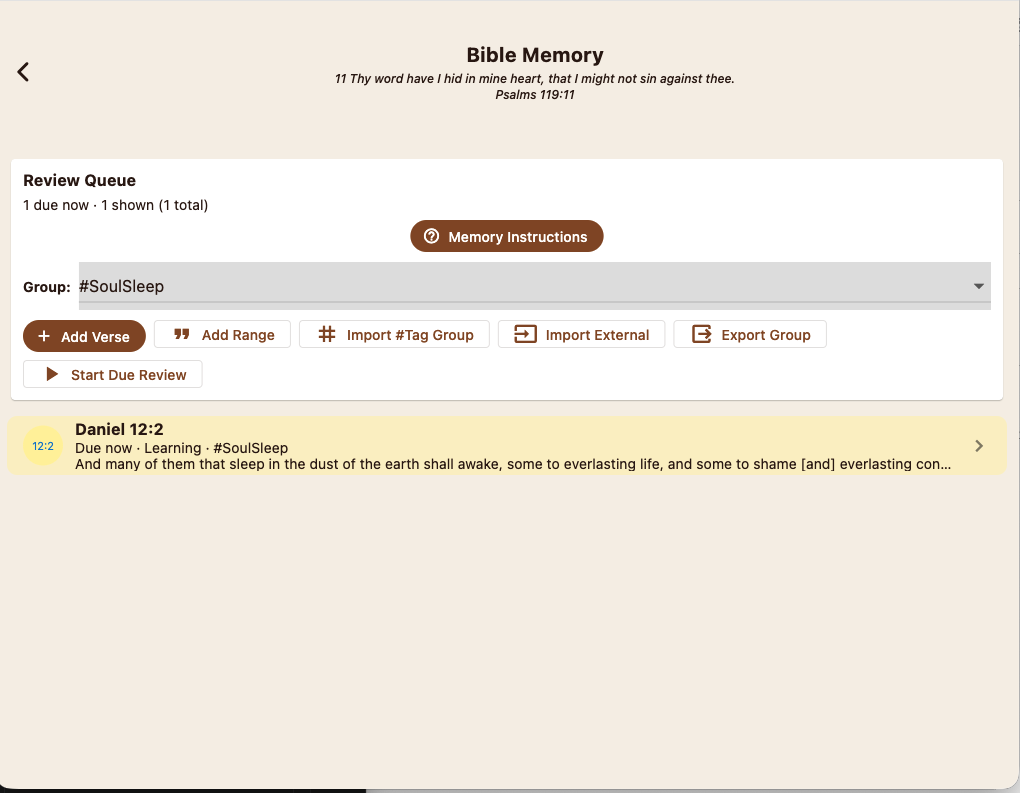
Bible Memory Main Screen
The Bible Memory screen shows the current review group, the review queue, and the memory tools for that group.
In the example shown, the selected group is #SoulSleep.
The main controls include:
Memory InstructionsAdd VerseAdd RangeImport #Tag GroupImport ExternalExport GroupStart Due Review
Step-By-Step: Import A # Tag Into Bible Memory
Use this sequence when you already have a saved # verse list and want to begin memorizing it.
- First create or review the
#tag you want to memorize, such as#SoulSleep. - In Bible Explorer, open the bottom-right menu and choose
Bible Memory. - On the Bible Memory screen, tap
Import #Tag Group. - Select the saved
#tag group you want to bring in. - Confirm the import so the verses appear in the Bible Memory queue.
- Review the queue and confirm the imported group is now the active memory set.
- Tap
Start Due Reviewto begin practicing the verses that are ready.
Picture guide:
- Use manual_images/sorted/26-bible-memory-queue-due.png to identify the queue screen and the
Import #Tag Groupbutton. - Use manual_images/sorted/27-bible-memory-stage1.png to see the first review stage after the import.
- Use manual_images/sorted/28-bible-memory-stage2-start.png to see the next level of hidden-word practice.
- Use manual_images/sorted/32-bible-memory-stage6-no-hints.png to see the later no-hints stage.
What The Main Buttons Do
The app's own instructions describe these controls this way:
Add Verse: add one verse at a timeAdd Range: add a full passage when you want to memorize several verses togetherImport #Tag Group: bring in an existing#taglist as a memory groupImport External: paste a formatted list from outside the appExport Group: copy the current memory list into a shareable text formatStart Due Review: open the verses that are scheduled for review right now
This makes Bible Memory easy to connect with the rest of the app, especially with verse lists that were first built as # tags.
How Bible Memory Works
Bible Memory uses a gradual drill process rather than asking the user to type the entire verse at once.
The process works like this:
- Add a verse or passage to memorize.
- Open that verse for practice.
- The drill begins by showing the full verse so it can be read carefully.
- Then words begin disappearing.
- The user types the first letter of each missing word.
- If the missing words are supplied correctly, the verse is learned more deeply and scheduled to return later.
- The verse repeats at growing intervals so it stays active in memory instead of fading away.
Step-By-Step: Run A Bible Memory Review
Use this sequence after verses are already in the Bible Memory queue.
- Open
Bible Memory. - Tap
Start Due Review. - Read the full verse carefully in the opening stage.
- Continue to the next prompt when the app begins hiding words.
- Type the first letter of each missing word as the prompt requests.
- Keep going until the review session completes or the app advances the verse cadence.
- Return later when the verse appears again in the due queue.
Picture guide:
- Use manual_images/sorted/27-bible-memory-stage1.png for the full-verse opening stage.
- Use manual_images/sorted/28-bible-memory-stage2-start.png for the hidden-word prompt stage.
- Use manual_images/sorted/32-bible-memory-stage6-no-hints.png for the advanced stage where the text is fully hidden.
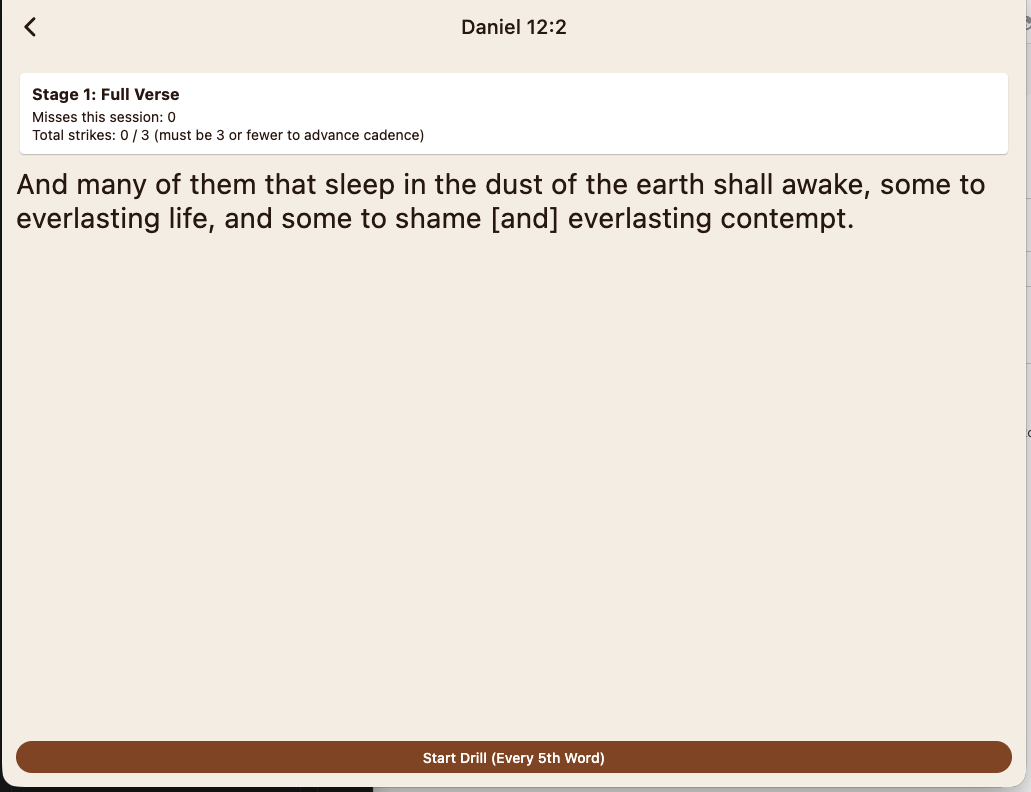
Review Stages
The screenshots show the verse moving through a sequence of memory stages.
These stages include:
Stage 1: Full VerseStage 2: Guess Every 5th Word- later stages that hide words more often
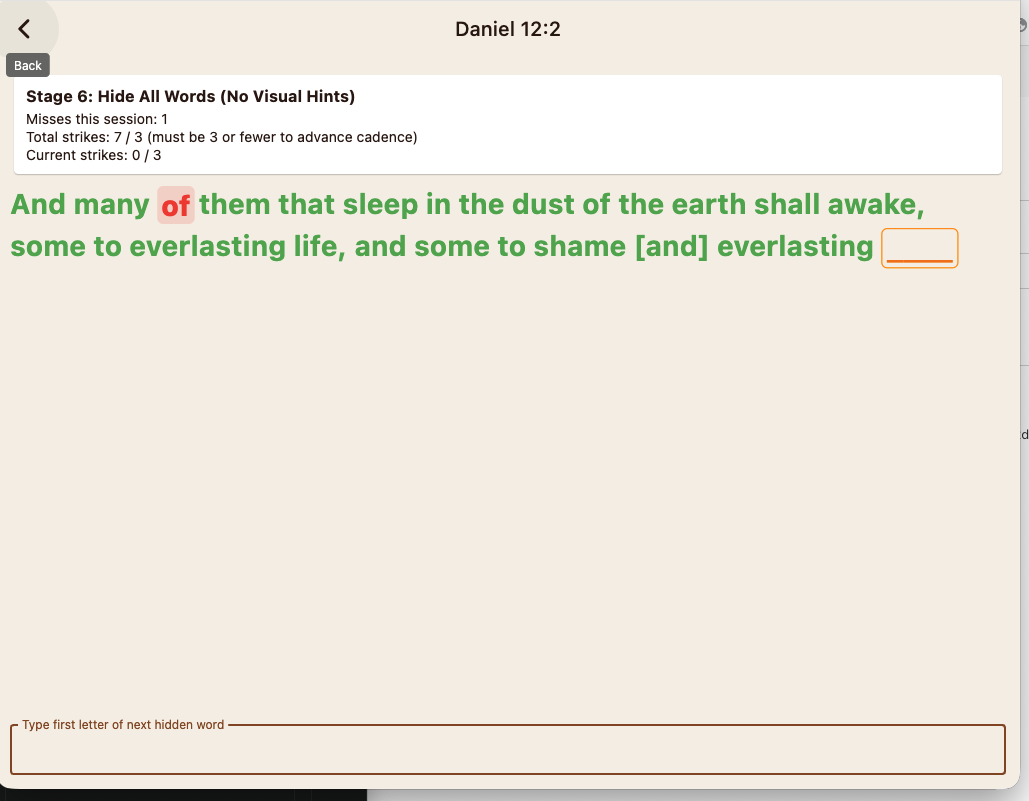
Stage 6: Hide All Words (No Visual Hints)
As the stages advance, more of the text is hidden and the user must supply more of the verse from memory.
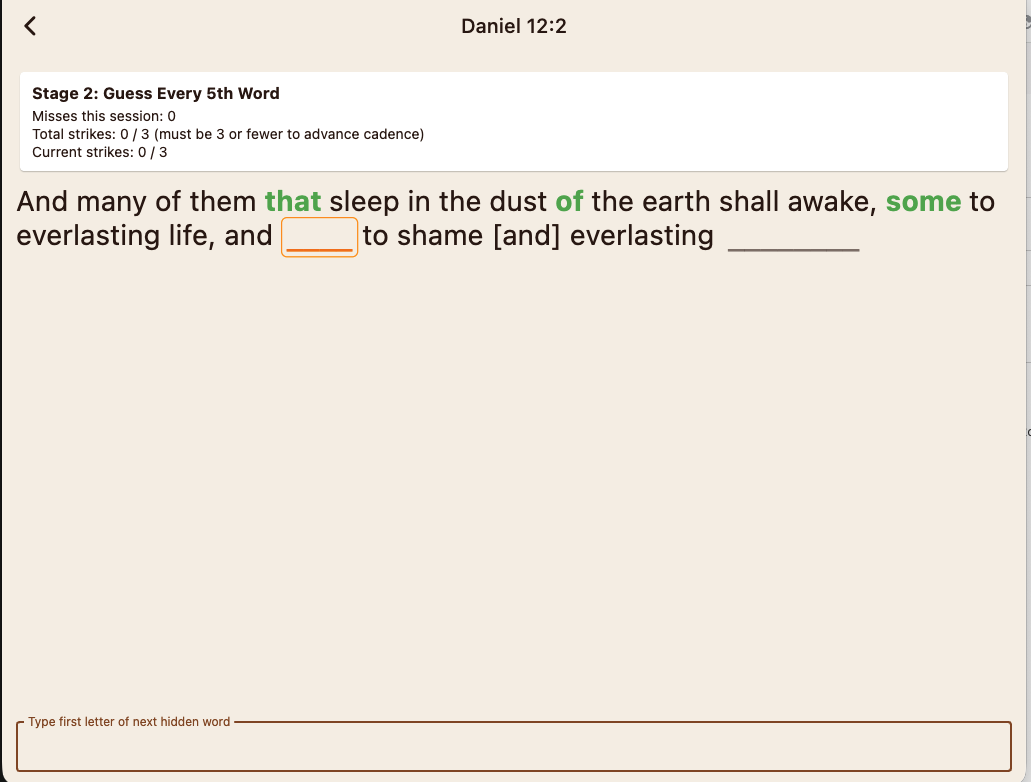
What The User Sees During Review
During review, the verse remains visible on the screen, but selected words are hidden according to the current stage.
The user is prompted to type the first letter of the next hidden word.
As correct answers are supplied:
- the hidden words are revealed
- the drill advances through more difficult stages
- the verse moves toward longer review intervals
The review screen also shows:
- misses this session
- total strikes
- the limit needed to advance cadence
This helps the user see how well the current review is going.
Why Bible Memory Fits With # Tags
Bible Memory works especially well with saved # lists.
A strong workflow is:
- build a
#tagstudy list first - import that
#taggroup into Bible Memory - practice the verses by repeated review
This allows a topic such as #SoulSleep to move from study and sharing into long-term memorization.
Bible Memory Summary
Use Bible Memory to turn saved verses or #tag groups into a spaced-review memory plan. The app begins with the full verse, gradually hides more words, and helps the user strengthen recall by supplying the missing words step by step over repeated review sessions.
Closing Note
Biblical Heritage #StudyBible is intended to grow with real study use.
If there is a feature you would like to see added, improved, or simplified, you are encouraged to request it.
User feedback helps guide future updates, refine study workflows, and identify areas where the app can better support personal study, teaching, group Bible reading, commentary use, and Scripture memory.
Need More Information?
If a step is unclear, if a screenshot is missing, or if you need a fuller walkthrough, use the feedback option below and tell us which manual section needs more detail.